HTML Styles - CSS


CSS stands for Cascading Style Sheets.

CSS saves a lot of work. It can control the layout of multiple web pages all at once.


Manipulate Text
Colors,  Boxes


What is CSS?

Cascading Style Sheets (CSS) is used to format the layout of a webpage.

With CSS, you can control the color, font, the size of text, the spacing between elements, how elements are positioned and laid out, what background images or background colors are to be used, different displays for different devices and screen sizes, and much more!

Tip: The word cascading means that a style applied to a parent element will also apply to all children elements within the parent. So, if you set the color of the body text to "blue", all headings, paragraphs, and other text elements within the body will also get the same color (unless you specify something else)!


Using CSS

CSS can be added to HTML documents in 3 ways:

  • Inline - by using the style attribute inside HTML elements
  • Internal - by using a <style> element in the <head> section
  • External - by using a <link> element to link to an external CSS file

The most common way to add CSS, is to keep the styles in external CSS files. However, in this tutorial we will use inline and internal styles, because this is easier to demonstrate, and easier for you to try it yourself.


Inline CSS

An inline CSS is used to apply a unique style to a single HTML element.

An inline CSS uses the style attribute of an HTML element.

The following example sets the text color of the <h1> element to blue, and the text color of the <p> element to red:

Example

<h1 style="color:blue;">A Blue Heading</h1>

<p style="color:red;">A red paragraph.</p>


Internal CSS

An internal CSS is used to define a style for a single HTML page.

An internal CSS is defined in the <head> section of an HTML page, within a <style> element.

The following example sets the text color of ALL the <h1> elements (on that page) to blue, and the text color of ALL the <p> elements to red. In addition, the page will be displayed with a "powderblue" background color: 

Example

<!DOCTYPE html>
<html>
<head>
<style>
body {background-color: powderblue;}
h1   {color: blue;}
p    {color: red;}
</style>
</head>
<body>

<h1>This is a heading</h1>
<p>This is a paragraph.</p>

</body>
</html>

External CSS

An external style sheet is used to define the style for many HTML pages.

To use an external style sheet, add a link to it in the <head> section of each HTML page:

Example

<!DOCTYPE html>
<html>
<head>
  <link rel="stylesheet" href="styles.css">
</head>
<body>

<h1>This is a heading</h1>
<p>This is a paragraph.</p>

</body>
</html>

The external style sheet can be written in any text editor. The file must not contain any HTML code, and must be saved with a .css extension.

Here is what the "styles.css" file looks like:

"styles.css":

body {
  background-color: powderblue;
}
h1 {
  color: blue;
}
p {
  color: red;
}

Tip: With an external style sheet, you can change the look of an entire web site, by changing one file!


CSS Colors, Fonts and Sizes

Here, we will demonstrate some commonly used CSS properties. You will learn more about them later.

The CSS color property defines the text color to be used.

The CSS font-family property defines the font to be used.

The CSS font-size property defines the text size to be used.

Example

Use of CSS color, font-family and font-size properties:

<!DOCTYPE html>
<html>
<head>
<style>
h1 {
  color: blue;
  font-family: verdana;
  font-size: 300%;
}
p {
  color: red;
  font-family: courier;
  font-size: 160%;
}
</style>
</head>
<body>

<h1>This is a heading</h1>
<p>This is a paragraph.</p>

</body>
</html>

CSS Border

The CSS border property defines a border around an HTML element.

Tip: You can define a border for nearly all HTML elements.

Example

Use of CSS border property: 

p {
  border: 2px solid powderblue;
}

CSS Padding

The CSS padding property defines a padding (space) between the text and the border.

Example

Use of CSS border and padding properties:

p {
  border: 2px solid powderblue;
  padding: 30px;
}

CSS Margin

The CSS margin property defines a margin (space) outside the border.

Example

Use of CSS border and margin properties:

p {
  border: 2px solid powderblue;
  margin: 50px;
}

Link to External CSS

External style sheets can be referenced with a full URL or with a path relative to the current web page.

Example

This example uses a full URL to link to a style sheet:

<link rel="stylesheet" href="https://www.w3schools.com/html/styles.css">

Example

This example links to a style sheet located in the html folder on the current web site: 

<link rel="stylesheet" href="/html/styles.css">

Example

This example links to a style sheet located in the same folder as the current page:

<link rel="stylesheet" href="styles.css">

You can read more about file paths in the chapter .


Chapter Summary

  • Use the HTML style attribute for inline styling
  • Use the HTML <style> element to define internal CSS
  • Use the HTML <link> element to refer to an external CSS file
  • Use the HTML <head> element to store <style> and <link> elements
  • Use the CSS color property for text colors
  • Use the CSS font-family property for text fonts
  • Use the CSS font-size property for text sizes
  • Use the CSS border property for borders
  • Use the CSS padding property for space inside the border
  • Use the CSS margin property for space outside the border

Tip: You can learn much more about CSS in our .


AngularJS extends HTML with new attributes.

AngularJS is perfect for Single Page Applications (SPAs).

AngularJS is easy to learn.


This Tutorial

This tutorial is specially designed to help you learn AngularJS as quickly and efficiently as possible.

First, you will learn the basics of AngularJS: directives, expressions, filters, modules, and controllers.

Then you will learn everything else you need to know about AngularJS:

Events, DOM, Forms, Input, Validation, Http, and more.


Try it Yourself Examples in Every Chapter

In every chapter, you can edit the examples online, and click on a button to view the result.

AngularJS Example

<!DOCTYPE html>
<html lang="en-US">
<script src="https://ajax.googleapis.com/ajax/libs/angularjs/1.6.9/angular.min.js"></script>
<body>

<div ng-app="">
  <p>Name : <input type="text" ng-model="name"></p>
  <h1>Hello {{name}}</h1>
</div>

</body>
</html>


AngularJS History

AngularJS version 1.0 was released in 2012.

Miško Hevery, a Google employee, started to work with AngularJS in 2009.

The idea turned out very well, and the project is now officially supported by Google.


My Learning

Track your progress with the free "My Learning" program here at W3Schools.

Log in to your account, and start earning points!

This is an optional feature. You can study W3Schools without using My Learning.


AngularJS Examples

W3Schools' AngularJS tutorial contains lots of AngularJS examples!


AngularJS Reference

The AngularJS reference contains all directives and filters used in this tutorial.

AngularJS HOME
 

AngularJS is a JavaScript framework. It can be added to an HTML page with a <script> tag.

AngularJS extends HTML attributes with Directives, and binds data to HTML with Expressions.


AngularJS is a JavaScript Framework

AngularJS is a JavaScript framework written in JavaScript.

AngularJS is distributed as a JavaScript file, and can be added to a web page with a script tag:

<script src="https://ajax.googleapis.com/ajax/libs/angularjs/1.6.9/angular.min.js"></script>

AngularJS Extends HTML

AngularJS extends HTML with ng-directives.

The ng-app directive defines an AngularJS application.

The ng-model directive binds the value of HTML controls (input, select, textarea) to application data.

The ng-bind directive binds application data to the HTML view.

AngularJS Example

<!DOCTYPE html>
<html>
<script src="https://ajax.googleapis.com/ajax/libs/angularjs/1.6.9/angular.min.js"></script>
<body>

<div ng-app="">
  <p>Name: <input type="text" ng-model="name"></p>
  <p ng-bind="name"></p>
</div>

</body>
</html>
 

Example explained:

AngularJS starts automatically when the web page has loaded.

The ng-app directive tells AngularJS that the

element is the "owner" of an AngularJS application.


The ng-model directive binds the value of the input field to the application variable name.

The ng-bind directive binds the content of the

element to the application variable name.


AngularJS Directives

As you have already seen, AngularJS directives are HTML attributes with an ng prefix.

The ng-init directive initializes AngularJS application variables.

AngularJS Example

<div ng-app="" ng-init="firstName='John'">

<p>The name is <span ng-bind="firstName"></span></p>

</div>


Alternatively with valid HTML:

AngularJS Example

<div data-ng-app="" data-ng-init="firstName='John'">

<p>The name is <span data-ng-bind="firstName"></span></p>

</div>
You can use data-ng-, instead of ng-, if you want to make your page HTML valid.


You will learn a lot more about directives later in this tutorial.


AngularJS Expressions

AngularJS expressions are written inside double braces: {{ expression }}.

AngularJS will "output" data exactly where the expression is written:

AngularJS Example

<!DOCTYPE html>
<html>
<script src="https://ajax.googleapis.com/ajax/libs/angularjs/1.6.9/angular.min.js"></script>
<body>

<div ng-app="">
  <p>My first expression: {{ 5 + 5 }}</p>
</div>

</body>
</html>


AngularJS expressions bind AngularJS data to HTML the same way as the ng-bind directive.

AngularJS Example

<!DOCTYPE html>
<html>
<script src="https://ajax.googleapis.com/ajax/libs/angularjs/1.6.9/angular.min.js"></script>
<body>

<div ng-app="">
  <p>Name: <input type="text" ng-model="name"></p>
  <p>{{name}}</p>
</div>

</body>
</html>

You will learn more about expressions later in this tutorial.


AngularJS Applications

AngularJS modules define AngularJS applications.

AngularJS controllers control AngularJS applications.

The ng-app directive defines the application, the ng-controller directive defines the controller.

AngularJS Example

<div ng-app="myApp" ng-controller="myCtrl">

First Name: <input type="text" ng-model="firstName"><br>
Last Name: <input type="text" ng-model="lastName"><br>
<br>
Full Name: {{firstName + " " + lastName}}

</div>

<script>
var app = angular.module('myApp', []);
app.controller('myCtrl'function($scope) {
  $scope.firstName= "John";
  $scope.lastName= "Doe";
});
</script>


AngularJS modules define applications:

AngularJS Module

var app = angular.module('myApp', []);

AngularJS controllers control applications:

AngularJS Controller

app.controller('myCtrl', function($scope) {
  $scope.firstName= "John";
  $scope.lastName= "Doe";
});

You will learn more about modules and controllers later in this tutorial.


AngularJS Intro
 

AngularJS binds data to HTML using Expressions.


AngularJS Expressions

AngularJS expressions can be written inside double braces: {{ expression }}.

AngularJS expressions can also be written inside a directive: ng-bind="expression".

AngularJS will resolve the expression, and return the result exactly where the expression is written.

AngularJS expressions are much like JavaScript expressions: They can contain literals, operators, and variables.

Example {{ 5 + 5 }} or {{ firstName + " " + lastName }}

Example

<!DOCTYPE html>
<html>
<script src="https://ajax.googleapis.com/ajax/libs/angularjs/1.6.9/angular.min.js"></script>
<body>

<div ng-app="">
  <p>My first expression: {{ 5 + 5 }}</p>
</div>

</body>
</html>

If you remove the ng-app directive, HTML will display the expression as it is, without solving it:

Example

<!DOCTYPE html>
<html>
<script src="https://ajax.googleapis.com/ajax/libs/angularjs/1.6.9/angular.min.js"></script>
<body>

<div>
  <p>My first expression: {{ 5 + 5 }}</p>
</div>

</body>
</html>


You can write expressions wherever you like, AngularJS will simply resolve the expression and return the result.

Example: Let AngularJS change the value of CSS properties.

Change the color of the input box below, by changing its value:

lightblue

Example

<div ng-app="" ng-init="myCol='lightblue'">

<input style="background-color:{{myCol}}" ng-model="myCol">

</div>


AngularJS Numbers

AngularJS numbers are like JavaScript numbers:

Example

<div ng-app="" ng-init="quantity=1;cost=5">

<p>Total in dollar: {{ quantity * cost }}</p>

</div>
 

Same example using ng-bind:

Example

<div ng-app="" ng-init="quantity=1;cost=5">

<p>Total in dollar: <span ng-bind="quantity * cost"></span></p>

</div>


Using ng-init is not very common. You will learn a better way to initialize data in the chapter about controllers.

AngularJS Strings

AngularJS strings are like JavaScript strings:

Example

<div ng-app="" ng-init="firstName='John';lastName='Doe'">

<p>The name is {{ firstName + " " + lastName }}</p>

</div>


Same example using ng-bind:

Example

<div ng-app="" ng-init="firstName='John';lastName='Doe'">

<p>The name is <span ng-bind="firstName + ' ' + lastName"></span></p>

</div>


AngularJS Objects

AngularJS objects are like JavaScript objects:

Example

<div ng-app="" ng-init="person={firstName:'John',lastName:'Doe'}">

<p>The name is {{ person.lastName }}</p>

</div>

Same example using ng-bind:

Example

<div ng-app="" ng-init="person={firstName:'John',lastName:'Doe'}">

<p>The name is <span ng-bind="person.lastName"></span></p>

</div>

AngularJS Arrays

AngularJS arrays are like JavaScript arrays:

Example

<div ng-app="" ng-init="points=[1,15,19,2,40]">

<p>The third result is {{ points[2] }}</p>

</div>

Same example using ng-bind:

Example

<div ng-app="" ng-init="points=[1,15,19,2,40]">

<p>The third result is <span ng-bind="points[2]"></span></p>

</div>

AngularJS Expressions vs. JavaScript Expressions

Like JavaScript expressions, AngularJS expressions can contain literals, operators, and variables.

Unlike JavaScript expressions, AngularJS expressions can be written inside HTML.

AngularJS expressions do not support conditionals, loops, and exceptions, while JavaScript expressions do.

AngularJS expressions support filters, while JavaScript expressions do not.

Learn about JavaScript in our .

 
AngularJS Expressions
 

An AngularJS module defines an application.

The module is a container for the different parts of an application.

The module is a container for the application controllers.

Controllers always belong to a module.


Creating a Module

A module is created by using the AngularJS function angular.module

<div ng-app="myApp">...</div>

<script>

var app = angular.module("myApp", []);

</script>

The "myApp" parameter refers to an HTML element in which the application will run.

Now you can add controllers, directives, filters, and more, to your AngularJS application.


Adding a Controller

Add a controller to your application, and refer to the controller with the ng-controller directive:

Example

<div ng-app="myApp" ng-controller="myCtrl">
{{ firstName + " " + lastName }}
</div>

<script>

var app = angular.module("myApp", []);

app.controller("myCtrl"function($scope) {
  $scope.firstName = "John";
  $scope.lastName = "Doe";
});

</script>

You will learn more about controllers later in this tutorial.


Adding a Directive

AngularJS has a set of built-in directives which you can use to add functionality to your application.

For a full reference, visit our .

In addition you can use the module to add your own directives to your applications:

Example

 
<div ng-app="myApp" w3-test-directive></div>

<script>
var app = angular.module("myApp", []);

app.directive("w3TestDirective"function() {
  return {
    template : "I was made in a directive constructor!"
  };
});
</script>


You will learn more about directives later in this tutorial.


Modules and Controllers in Files

It is common in AngularJS applications to put the module and the controllers in JavaScript files.

In this example, "myApp.js" contains an application module definition, while "myCtrl.js" contains the controller:

Example


<!DOCTYPE html>
<html>
<script src="https://ajax.googleapis.com/ajax/libs/angularjs/1.6.9/angular.min.js"></script>
<body>

<div ng-app="myApp" ng-controller="myCtrl">
{{ firstName + " " + lastName }}
</div>

<script src="myApp.js"></script>
<script src="myCtrl.js"></script>

</body>
</html>


myApp.js

var app = angular.module("myApp", []);


The [] parameter in the module definition can be used to define dependent modules.

Without the [] parameter, you are not creating a new module, but retrieving an existing one.


myCtrl.js

app.controller("myCtrl", function($scope) {
  $scope.firstName = "John";
  $scope.lastName= "Doe";
});

Functions can Pollute the Global Namespace

Global functions should be avoided in JavaScript. They can easily be overwritten or destroyed by other scripts.

AngularJS modules reduces this problem, by keeping all functions local to the module.


When to Load the Library

While it is common in HTML applications to place scripts at the end of the element, it is recommended that you load the AngularJS library either in the or at the start of the .

This is because calls to angular.module can only be compiled after the library has been loaded.

Example

<!DOCTYPE html>
<html>
<body>
<script src="https://ajax.googleapis.com/ajax/libs/angularjs/1.6.9/angular.min.js"></script>

<div ng-app="myApp" ng-controller="myCtrl">
{{ firstName + " " + lastName }}
</div>

<script>
var app = angular.module("myApp", []);
app.controller("myCtrl"function($scope) {
  $scope.firstName = "John";
  $scope.lastName = "Doe";
});
</script>

</body>
</html>
AngularJS Modules
 

AngularJS lets you extend HTML with new attributes called Directives.

AngularJS has a set of built-in directives which offers functionality to your applications.

AngularJS also lets you define your own directives.


AngularJS Directives

AngularJS directives are extended HTML attributes with the prefix ng-.

The ng-app directive initializes an AngularJS application.

The ng-init directive initializes application data.

The ng-model directive binds the value of HTML controls (input, select, textarea) to application data.

Read about all AngularJS directives in our .

Example

<div ng-app="" ng-init="firstName='John'">

<p>Name: <input type="text" ng-model="firstName"></p>
<p>You wrote: {{ firstName }}</p>

</div>

The ng-app directive also tells AngularJS that the <div> element is the "owner" of the AngularJS application.


Data Binding

The {{ firstName }} expression, in the example above, is an AngularJS data binding expression.

Data binding in AngularJS binds AngularJS expressions with AngularJS data.

{{ firstName }} is bound with ng-model="firstName".

In the next example two text fields are bound together with two ng-model directives:

Example

<div ng-app="" ng-init="quantity=1;price=5">

Quantity: <input type="number" ng-model="quantity">
Costs:    <input type="number" ng-model="price">

Total in dollar: {{ quantity * price }}

</div>


Using ng-init is not very common. You will learn how to initialize data in the chapter about controllers.


Repeating HTML Elements

The ng-repeat directive repeats an HTML element:

Example 

<div ng-app="" ng-init="names=['Jani','Hege','Kai']">
  <ul>
    <li ng-repeat="x in names">
      {{ x }}
    </li>
  </ul>
</div>

The ng-repeat directive actually clones HTML elements once for each item in a collection.

The ng-repeat directive used on an array of objects:

Example

<div ng-app="" ng-init="names=[
{name:'Jani',country:'Norway'},
{name:'Hege',country:'Sweden'},
{name:'Kai',country:'Denmark'}]"
>


<ul>
  <li ng-repeat="x in names">
    {{ x.name + ', ' + x.country }}
  </li>
</ul>

</div>


AngularJS is perfect for database CRUD (Create Read Update Delete) applications.
Just imagine if these objects were records from a database.


The ng-app Directive

The ng-app directive defines the root element of an AngularJS application.

The ng-app directive will auto-bootstrap (automatically initialize) the application when a web page is loaded.


The ng-init Directive

The ng-init directive defines initial values for an AngularJS application.

Normally, you will not use ng-init. You will use a controller or module instead.

You will learn more about controllers and modules later.


The ng-model Directive

The ng-model directive binds the value of HTML controls (input, select, textarea) to application data.

The ng-model directive can also:

  • Provide type validation for application data (number, email, required).
  • Provide status for application data (invalid, dirty, touched, error).
  • Provide CSS classes for HTML elements.
  • Bind HTML elements to HTML forms.

Read more about the ng-model directive in the next chapter.


Create New Directives

In addition to all the built-in AngularJS directives, you can create your own directives.

New directives are created by using the .directive function.

To invoke the new directive, make an HTML element with the same tag name as the new directive.

When naming a directive, you must use a camel case name, w3TestDirective, but when invoking it, you must use - separated name, w3-test-directive:

Example

<body ng-app="myApp">

<w3-test-directive></w3-test-directive>

<script>
var app = angular.module("myApp", []);
app.directive("w3TestDirective"function() {
  return {
    template : "<h1>Made by a directive!</h1>"
  };
});
</script>

</body>

You can invoke a directive by using:

  • Element name
  • Attribute
  • Class
  • Comment

The examples below will all produce the same result:


Element name

<w3-test-directive></w3-test-directive>

Attribute

<div w3-test-directive></div>

Class

<div class="w3-test-directive"></div>
 
 
Comment
<!-- directive: w3-test-directive -->

Restrictions

You can restrict your directives to only be invoked by some of the methods.

Example

By adding a restrict property with the value "A", the directive can only be invoked by attributes:

var app = angular.module("myApp", []);
app.directive("w3TestDirective", function() {
  return {
    restrict : "A",
    template : ""
  };
});

The legal restrict values are:

  • E for Element name
  • A for Attribute
  • C for Class
  • M for Comment

By default the value is EA, meaning that both Element names and attribute names can invoke the directive.


AngularJS Directives
 

The ng-model directive binds the value of HTML controls (input, select, textarea) to application data.


The ng-model Directive

With the ng-model directive you can bind the value of an input field to a variable created in AngularJS.

Example

<div ng-app="myApp" ng-controller="myCtrl">
  Name: <input ng-model="name">
</div>

<script>
var app = angular.module('myApp', []);
app.controller('myCtrl'function($scope) {
  $scope.name = "John Doe";
});
</script>

Two-Way Binding

The binding goes both ways. If the user changes the value inside the input field, the AngularJS property will also change its value:

Example

<div ng-app="myApp" ng-controller="myCtrl">
  Name: <input ng-model="name">
  <h1>You entered: {{name}}</h1>
</div>


Validate User Input

The ng-model directive can provide type validation for application data (number, e-mail, required):

Example

<form ng-app="" name="myForm">
  Email:
  <input type="email" name="myAddress" ng-model="text">
  <span ng-show="myForm.myAddress.$error.email">Not a valid e-mail address</span>
</form>

In the example above, the span will be displayed only if the expression in the ng-show attribute returns true.

If the property in the ng-model attribute does not exist, AngularJS will create one for you.


Application Status

The ng-model directive can provide status for application data (valid, dirty, touched, error):

<form ng-app="" name="myForm" ng-init="myText = '[email protected]'">
  Email:
  <input type="email" name="myAddress" ng-model="myText" required>
  <h1>Status</h1>
  {{myForm.myAddress.$valid}}
  {{myForm.myAddress.$dirty}}
  {{myForm.myAddress.$touched}}
</form>

CSS Classes

The ng-model directive provides CSS classes for HTML elements, depending on their status:

Example

<style>
input.ng-invalid {
  background-color: lightblue;
}
</style>
<body>

<form ng-app="" name="myForm">
  Enter your name:
  <input name="myName" ng-model="myText" required>
</form>

The ng-model directive adds/removes the following classes, according to the status of the form field:

  • ng-empty
  • ng-not-empty
  • ng-touched
  • ng-untouched
  • ng-valid
  • ng-invalid
  • ng-dirty
  • ng-pending
  • ng-pristine


AngularJS Modules
 

Data binding in AngularJS is the synchronization between the model and the view.


Data Model

AngularJS applications usually have a data model. The data model is a collection of data available for the application.

Example

var app = angular.module('myApp', []);
app.controller('myCtrl', function($scope) {
  $scope.firstname = "John";
  $scope.lastname = "Doe";
});

HTML View

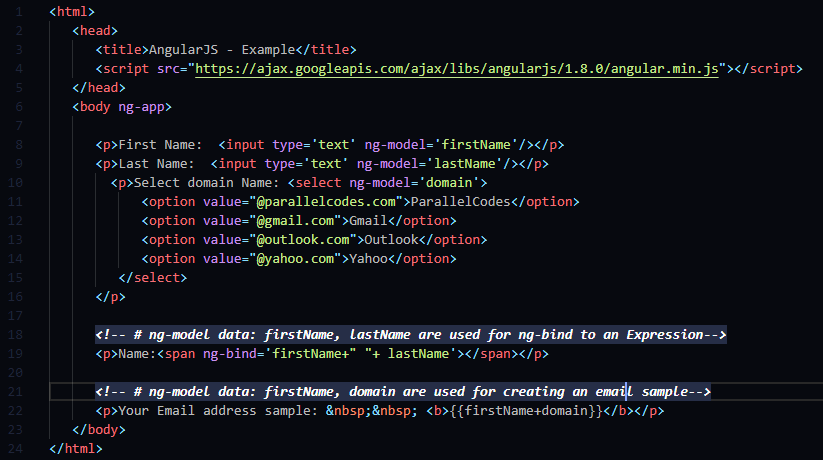
The HTML container where the AngularJS application is displayed, is called the view.

The view has access to the model, and there are several ways of displaying model data in the view.

You can use the ng-bind directive, which will bind the innerHTML of the element to the specified model property:

Example

<p ng-bind="firstname"></p>

You can also use double braces {{ }} to display content from the model:

Example

<p>First name: {{firstname}}</p>

Or you can use the ng-model directive on HTML controls to bind the model to the view.


The ng-model Directive

Use the ng-model directive to bind data from the model to the view on HTML controls (input, select, textarea)

Example

<input ng-model="firstname">

The ng-model directive provides a two-way binding between the model and the view.
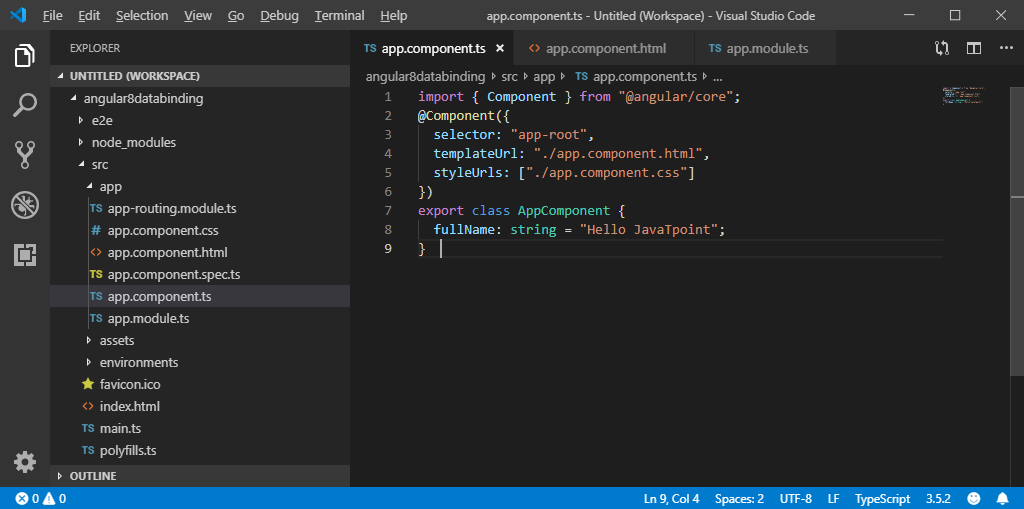

Two-way Binding

Data binding in AngularJS is the synchronization between the model and the view.

When data in the model changes, the view reflects the change, and when data in the view changes, the model is updated as well. This happens immediately and automatically, which makes sure that the model and the view is updated at all times.

Example

 
<div ng-app="myApp" ng-controller="myCtrl">
  Name: <input ng-model="firstname">
  <h1>{{firstname}}</h1>
</div>

<script>
var app = angular.module('myApp', []);
app.controller('myCtrl'function($scope) {
  $scope.firstname = "John";
  $scope.lastname = "Doe";
});
</script>


AngularJS Controller

Applications in AngularJS are controlled by controllers. Read about controllers in the chapter.

Because of the immediate synchronization of the model and the view, the controller can be completely separated from the view, and simply concentrate on the model data. Thanks to the data binding in AngularJS, the view will reflect any changes made in the controller.

Example

<div ng-app="myApp" ng-controller="myCtrl">
  <h1 ng-click="changeName()">{{firstname}}</h1>
</div>

<script>
var app = angular.module('myApp', []);
app.controller('myCtrl'function($scope) {
  $scope.firstname = "John";
  $scope.changeName = function() {
    $scope.firstname = "Nelly";
  }
});
</script>
AngularJS Data Binding
 

AngularJS controllers control the data of AngularJS applications.

AngularJS controllers are regular JavaScript Objects.


AngularJS Controllers

AngularJS applications are controlled by controllers.

The ng-controller directive defines the application controller.

A controller is a JavaScript Object, created by a standard JavaScript object constructor.

AngularJS Example

<div ng-app="myApp" ng-controller="myCtrl">

First Name: <input type="text" ng-model="firstName"><br>
Last Name: <input type="text" ng-model="lastName"><br>
<br>
Full Name: {{firstName + " " + lastName}}

</div>

<script>
var app = angular.module('myApp', []);
app.controller('myCtrl'function($scope) {
  $scope.firstName = "John";
  $scope.lastName = "Doe";
});
</script>

Application explained:

The AngularJS application is defined by  ng-app="myApp". The application runs inside the

.The ng-controller="myCtrl" attribute is an AngularJS directive. It defines a controller.

The myCtrl function is a JavaScript function.

AngularJS will invoke the controller with a $scope object.

In AngularJS, $scope is the application object (the owner of application variables and functions).

The controller creates two properties (variables) in the scope (firstName and lastName).

The ng-model directives bind the input fields to the controller properties (firstName and lastName).


Controller Methods

The example above demonstrated a controller object with two properties: lastName and firstName.

A controller can also have methods (variables as functions):

AngularJS Example

<div ng-app="myApp" ng-controller="personCtrl">

First Name: <input type="text" ng-model="firstName"><br>
Last Name: <input type="text" ng-model="lastName"><br>
<br>
Full Name: {{fullName()}}

</div>

<script>
var app = angular.module('myApp', []);
app.controller('personCtrl'function($scope) {
  $scope.firstName = "John";
  $scope.lastName = "Doe";
  $scope.fullName = function() {
    return $scope.firstName + " " + $scope.lastName;
  };
});
</script>

Controllers In External Files

In larger applications, it is common to store controllers in external files.

Just copy the code between the


Another Example

<div ng-app="myApp" ng-controller="personCtrl">

First Name: <input type="text" ng-model="firstName"><br>
Last Name: <input type="text" ng-model="lastName"><br>
<br>
Full Name: {{fullName()}}

</div>

<script src="personController.js"></script>

AngularJS Example

 
<div ng-app="myApp" ng-controller="namesCtrl">

<ul>
  <li ng-repeat="x in names">
    {{ x.name + ', ' + x.country }}
  </li>
</ul>

</div>

<script src="namesController.js"></script>
AngularJS Controllers
 

The scope is the binding part between the HTML (view) and the JavaScript (controller).

The scope is an object with the available properties and methods.

The scope is available for both the view and the controller.


How to Use the Scope?

When you make a controller in AngularJS, you pass the $scope object as an argument:

Example

Properties made in the controller, can be referred to in the view:

<div ng-app="myApp" ng-controller="myCtrl">

<h1>{{carname}}</h1>

</div>

<script>
var app = angular.module('myApp', []);

app.controller('myCtrl'function($scope) {
  $scope.carname = "Volvo";
});
</script>

When adding properties to the $scope object in the controller, the view (HTML) gets access to these properties.

In the view, you do not use the prefix $scope, you just refer to a property name, like {{carname}}.


Understanding the Scope

If we consider an AngularJS application to consist of:

  • View, which is the HTML.
  • Model, which is the data available for the current view.
  • Controller, which is the JavaScript function that makes/changes/removes/controls the data.

Then the scope is the Model.

The scope is a JavaScript object with properties and methods, which are available for both the view and the controller.

Example

If you make changes in the view, the model and the controller will be updated:

<div ng-app="myApp" ng-controller="myCtrl">

<input ng-model="name">

<h1>My name is {{name}}</h1>

</div>

<script>
var app = angular.module('myApp', []);

app.controller('myCtrl'function($scope) {
  $scope.name = "John Doe";
});
</script>


Know Your Scope

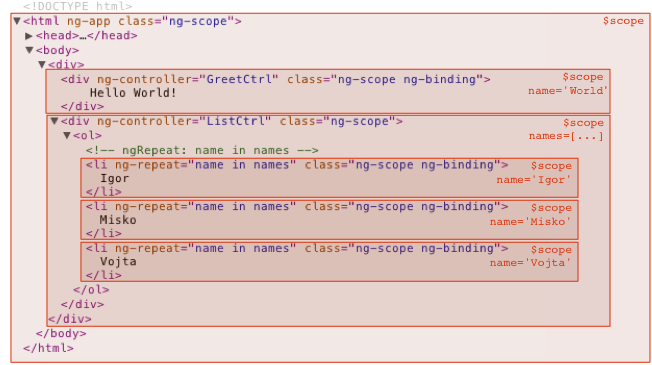
It is important to know which scope you are dealing with, at any time.

In the two examples above there is only one scope, so knowing your scope is not an issue, but for larger applications there can be sections in the HTML DOM which can only access certain scopes.

Example

When dealing with the ng-repeat directive, each repetition has access to the current repetition object:

<div ng-app="myApp" ng-controller="myCtrl">

<ul>
  <li ng-repeat="x in names">{{x}}</li>
</ul>

</div>

<script>
var app = angular.module('myApp', []);

app.controller('myCtrl'function($scope) {
  $scope.names = ["Emil""Tobias""Linus"];
});
</script>
 

Each <li> element has access to the current repetition object, in this case a string, which is referred to by using x.


Root Scope

All applications have a $rootScope which is the scope created on the HTML element that contains the ng-app directive.

The rootScope is available in the entire application.

If a variable has the same name in both the current scope and in the rootScope, the application uses the one in the current scope.

Example

A variable named "color" exists in both the controller's scope and in the rootScope:

<body ng-app="myApp">

<p>The rootScope's favorite color:</p>
<h1>{{color}}</h1>

<div ng-controller="myCtrl">
  <p>The scope of the controller's favorite color:</p>
  <h1>{{color}}</h1>
</div>

<p>The rootScope's favorite color is still:</p>
<h1>{{color}}</h1>

<script>
var app = angular.module('myApp', []);
app.run(function($rootScope) {
  $rootScope.color = 'blue';
});
app.controller('myCtrl'function($scope) {
  $scope.color = "red";
});
</script>
</body>


AngularJS Scopes
 

Filters can be added in AngularJS to format data.


AngularJS Filters

AngularJS provides filters to transform data:

  • currency Format a number to a currency format.
  • date Format a date to a specified format.
  • filter Select a subset of items from an array.
  • json Format an object to a JSON string.
  • limitTo Limits an array/string, into a specified number of elements/characters.
  • lowercase Format a string to lower case.
  • number Format a number to a string.
  • orderBy Orders an array by an expression.
  • uppercase Format a string to upper case.

Adding Filters to Expressions

Filters can be added to expressions by using the pipe character |, followed by a filter.

The uppercase filter format strings to upper case:

Example

<div ng-app="myApp" ng-controller="personCtrl">

<p>The name is {{ lastName | uppercase }}</p>

</div>

The lowercase filter format strings to lower case:

Example

<div ng-app="myApp" ng-controller="personCtrl">

<p>The name is {{ lastName | lowercase }}</p>

</div>


Adding Filters to Directives

Filters are added to directives, like ng-repeat, by using the pipe character |, followed by a filter:

Example

The orderBy filter sorts an array:

<div ng-app="myApp" ng-controller="namesCtrl">

<ul>
  <li ng-repeat="x in names | orderBy:'country'">
    {{ x.name + ', ' + x.country }}
  </li>
</ul>

</div>


The currency Filter

The currency filter formats a number as currency:

Example

<div ng-app="myApp" ng-controller="costCtrl">

<h1>Price: {{ price | currency }}</h1>

</div>

The filter Filter

The filter filter selects a subset of an array.

The filter filter can only be used on arrays, and it returns an array containing only the matching items.

Example

Return the names that contains the letter "i":

 
<div ng-app="myApp" ng-controller="namesCtrl">

<ul>
  <li ng-repeat="x in names | filter : 'i'">
    {{ x }}
  </li>
</ul>

</div>


Filter an Array Based on User Input

By setting the ng-model directive on an input field, we can use the value of the input field as an expression in a filter.

Type a letter in the input field, and the list will shrink/grow depending on the match:

 
  • Jani
  • Carl
  • Margareth
  • Hege
  • Joe
  • Gustav
  • Birgit
  • Mary
  • Kai

Example


<div ng-app="myApp" ng-controller="namesCtrl">

<p><input type="text" ng-model="test"></p>

<ul>
  <li ng-repeat="x in names | filter : test">
    {{ x }}
  </li>
</ul>

</div>


Sort an Array Based on User Input

Click the table headers to change the sort order::


By adding the ng-click directive on the table headers, we can run a function that changes the sorting order of the array:

Example


<div ng-app="myApp" ng-controller="namesCtrl">

<table border="1" width="100%">
  <tr>
    <th ng-click="orderByMe('name')">Name</th>
    <th ng-click="orderByMe('country')">Country</th>
  </tr>
  <tr ng-repeat="x in names | orderBy:myOrderBy">
    <td>{{x.name}}</td>
    <td>{{x.country}}</td>
  </tr>
</table>

</div>

<script>
angular.module('myApp', []).controller('namesCtrl'function($scope) {
  $scope.names = [
    {name:'Jani',country:'Norway'},
    {name:'Carl',country:'Sweden'},
    {name:'Margareth',country:'England'},
    {name:'Hege',country:'Norway'},
    {name:'Joe',country:'Denmark'},
    {name:'Gustav',country:'Sweden'},
    {name:'Birgit',country:'Denmark'},
    {name:'Mary',country:'England'},
    {name:'Kai',country:'Norway'}
  ];
  $scope.orderByMe = function(x) {
    $scope.myOrderBy = x;
  }
});
</script>


Custom Filters

You can make your own filters by registering a new filter factory function with your module:

Example

Make a custom filter called "myFormat":

<ul ng-app="myApp" ng-controller="namesCtrl">
  <li ng-repeat="x in names">
    {{x | myFormat}}
  </li>
</ul>

<script>
var app = angular.module('myApp', []);
app.filter('myFormat'function() {
  return function(x) {
    var i, c, txt = "";
    for (i = 0; i < x.length; i++) {
      c = x[i];
      if (i % 2 == 0) {
        c = c.toUpperCase();
      }
      txt += c;
    }
    return txt;
  };
});
app.controller('namesCtrl'function($scope) {
  $scope.names = ['Jani''Carl''Margareth''Hege''Joe''Gustav''Birgit''Mary''Kai'];
});
</script>


The myFormat filter will format every other character to uppercase.


AngularJS Filters

In AngularJS you can make your own service, or use one of the many built-in services.


What is a Service?

In AngularJS, a service is a function, or object, that is available for, and limited to, your AngularJS application.

AngularJS has about 30 built-in services. One of them is the $location service.

The $location service has methods which return information about the location of the current web page:

Example

Use the $location service in a controller:

var app = angular.module('myApp', []);
app.controller('customersCtrl', function($scope, $location) {
    $scope.myUrl = $location.absUrl();
});

Note that the $location service is passed in to the controller as an argument. In order to use the service in the controller, it must be defined as a dependency.


Why use Services?

For many services, like the $location service, it seems like you could use objects that are already in the DOM, like the window.location object, and you could, but it would have some limitations, at least for your AngularJS application.

AngularJS constantly supervises your application, and for it to handle changes and events properly, AngularJS prefers that you use the $location service instead of the window.location object.


The $http Service

The $http service is one of the most common used services in AngularJS applications. The service makes a request to the server, and lets your application handle the response.

Example

Use the $http service to request data from the server:

var app = angular.module('myApp', []);
app.controller('myCtrl', function($scope, $http) {
  $http.get("welcome.htm").then(function (response) {
    $scope.myWelcome = response.data;
  });
});

This example demonstrates a very simple use of the $http service. Learn more about the $http service in the .


The $timeout Service

The $timeout service is AngularJS' version of the window.setTimeout function.

Example

Display a new message after two seconds:

var app = angular.module('myApp', []);
app.controller('myCtrl', function($scope, $timeout) {
  $scope.myHeader = "Hello World!";
  $timeout(function () {
    $scope.myHeader = "How are you today?";
  }, 2000);
});

The $interval Service

The $interval service is AngularJS' version of the window.setInterval function.

Example

Display the time every second:

var app = angular.module('myApp', []);
app.controller('myCtrl', function($scope, $interval) {
  $scope.theTime = new Date().toLocaleTimeString();
  $interval(function () {
    $scope.theTime = new Date().toLocaleTimeString();
  }, 1000);
});

Create Your Own Service

To create your own service, connect your service to the module:

Create a service named hexafy:

app.service('hexafy', function() {
  this.myFunc = function (x) {
    return x.toString(16);
  }
});

To use your custom made service, add it as a dependency when defining the controller:

Example

Use the custom made service named hexafy to convert a number into a hexadecimal number:

app.controller('myCtrl', function($scope, hexafy) {
  $scope.hex = hexafy.myFunc(255);
});

Use a Custom Service Inside a Filter

Once you have created a service, and connected it to your application, you can use the service in any controller, directive, filter, or even inside other services.

To use the service inside a filter, add it as a dependency when defining the filter:

The service hexafy used in the filter myFormat:

app.filter('myFormat',['hexafy', function(hexafy) {
  return function(x) {
    return hexafy.myFunc(x);
  };
}]);

You can use the filter when displaying values from an object, or an array:

<ul>
  <li ng-repeat="x in counts">{{x | myFormat}}</li>
</ul>

AngularJS Services
 

$http is an AngularJS service for reading data from remote servers.


AngularJS $http

The AngularJS $http service makes a request to the server, and returns a response.

Example

Make a simple request to the server, and display the result in a header:

<div ng-app="myApp" ng-controller="myCtrl">

<p>Today's welcome message is:</p>
<h1>{{myWelcome}}</h1>

</div>

<script>
var app = angular.module('myApp', []);
app.controller('myCtrl'function($scope, $http) {
  $http.get("welcome.htm")
  .then(function(response) {
    $scope.myWelcome = response.data;
  });
});
</script>


Methods

The example above uses the .get method of the $http service.

The .get method is a shortcut method of the $http service. There are several shortcut methods:

  • .delete()
  • .get()
  • .head()
  • .jsonp()
  • .patch()
  • .post()
  • .put()

The methods above are all shortcuts of calling the $http service:

Example

var app = angular.module('myApp', []);
app.controller('myCtrl', function($scope, $http) {
  $http({
    method : "GET",
      url : "welcome.htm"
  }).then(function mySuccess(response) {
    $scope.myWelcome = response.data;
  }, function myError(response) {
    $scope.myWelcome = response.statusText;
  });
});

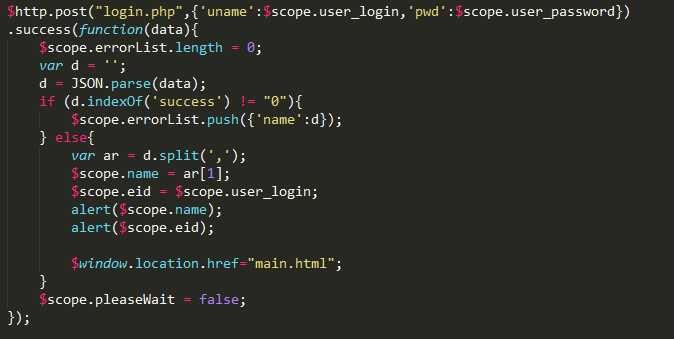
The example above executes the $http service with an object as an argument. The object is specifying the HTTP method, the url, what to do on success, and what to do on failure.


Properties

The response from the server is an object with these properties:

  • .config the object used to generate the request.
  • .data a string, or an object, carrying the response from the server.
  • .headers a function to use to get header information.
  • .status a number defining the HTTP status.
  • .statusText a string defining the HTTP status.

Example

var app = angular.module('myApp', []);
app.controller('myCtrl', function($scope, $http) {
  $http.get("welcome.htm")
  .then(function(response) {
    $scope.content = response.data;
    $scope.statuscode = response.status;
    $scope.statustext = response.statusText;
  });
});

To handle errors, add one more functions to the .then method:

Example

var app = angular.module('myApp', []);
app.controller('myCtrl', function($scope, $http) {
  $http.get("wrongfilename.htm")
  .then(function(response) {
    // First function handles success
    $scope.content = response.data;
  }, function(response) {
    // Second function handles error
    $scope.content = "Something went wrong";
  });
});

JSON

The data you get from the response is expected to be in JSON format.

JSON is a great way of transporting data, and it is easy to use within AngularJS, or any other JavaScript.

Example: On the server we have a file that returns a JSON object containing 15 customers, all wrapped in array called records.


Example

The ng-repeat directive is perfect for looping through an array:

<div ng-app="myApp" ng-controller="customersCtrl">

<ul>
  <li ng-repeat="x in myData">
    {{ x.Name + ', ' + x.Country }}
  </li>
</ul>

</div>

<script>
var app = angular.module('myApp', []);
app.controller('customersCtrl'function($scope, $http) {
  $http.get("customers.php").then(function(response) {
    $scope.myData = response.data.records;
  });
});
</script>


Application explained:

The application defines the customersCtrl controller, with a $scope and $http object.

$http is an XMLHttpRequest object for requesting external data.

$http.get() reads JSON data from .

On success, the controller creates a property, myData, in the scope, with JSON data from the server.


AngularJS Http

The ng-repeat directive is perfect for displaying tables.


Displaying Data in a Table

Displaying tables with angular is very simple:

AngularJS Example

<div ng-app="myApp" ng-controller="customersCtrl">

<table>
  <tr ng-repeat="x in names">
    <td>{{ x.Name }}</td>
    <td>{{ x.Country }}</td>
  </tr>
</table>

</div>

<script>
var app = angular.module('myApp', []);
app.controller('customersCtrl', function($scope, $http) {
  $http.get("customers.php")
  .then(function (response) {$scope.names = response.data.records;});
});
</script>

Displaying with CSS Style

To make it nice, add some CSS to the page:

CSS Style

<style>
table, th , td {
  border: 1px solid grey;
  border-collapse: collapse;
  padding: 5px;
}

table tr:nth-child(odd) {
  background-color: #f1f1f1;
}

table tr:nth-child(even) {
  background-color: #ffffff;
}
</style>


Display with orderBy Filter

To sort the table, add an orderBy filter: 

AngularJS Example

<table>
  <tr ng-repeat="x in names | orderBy : 'Country'">
    <td>{{ x.Name }}</td>
    <td>{{ x.Country }}</td>
  </tr>
</table>

Display with uppercase Filter

To display uppercase, add an uppercase filter: 

AngularJS Example

<table>
  <tr ng-repeat="x in names">
    <td>{{ x.Name }}</td>
    <td>{{ x.Country | uppercase }}</td>
  </tr>
</table>

Display the Table Index ($index)

To display the table index, add a <td> with $index

AngularJS Example

<table>
  <tr ng-repeat="x in names">
    <td>{{ $index + 1 }}</td>
    <td>{{ x.Name }}</td>
    <td>{{ x.Country }}</td>
  </tr>
</table>

Using $even and $odd

AngularJS Example

<table>
  <tr ng-repeat="x in names">
    <td ng-if="$odd" style="background-color:#f1f1f1">{{ x.Name }}</td>
    <td ng-if="$even">{{ x.Name }}</td>
    <td ng-if="$odd" style="background-color:#f1f1f1">{{ x.Country }}</td>
    <td ng-if="$even">{{ x.Country }}</td>
  </tr>
</table>

AngularJS Tables
 

AngularJS lets you create dropdown lists based on items in an array, or an object.


Creating a Select Box Using ng-options

If you want to create a dropdown list, based on an object or an array in AngularJS, you should use the ng-options directive:

Example

<div ng-app="myApp" ng-controller="myCtrl">

<select ng-model="selectedName" ng-options="x for x in names">
</select>

</div>

<script>

var app = angular.module('myApp', []);
app.controller(
'myCtrl'function($scope) {
  $scope.names = [
"Emil""Tobias""Linus"];
});

</script>


ng-options vs ng-repeat

You can also use the ng-repeat directive to make the same dropdown list:

Example

<select>
  
<option ng-repeat="x in names">{{x}}</option>
</select>

Because the ng-repeat directive repeats a block of HTML code for each item in an array, it can be used to create options in a dropdown list, but the ng-options directive was made especially for filling a dropdown list with options.

What Do I Use?

You can use both the ng-repeat directive and the ng-options directive:

Assume you have an array of objects:

$scope.cars = [
  {model : 
"Ford Mustang", color : "red"},
  {model : 
"Fiat 500", color : "white"},
  {model : 
"Volvo XC90", color : "black"}
];


Example

Using ng-repeat:

<select ng-model="selectedCar">
  
<option ng-repeat="x in cars" value="{{x.model}}">{{x.model}}</option>
</select>

<h1>You selected: {{selectedCar}}</h1>


When using the value as an object, use ng-value insead of value:

Example

<select ng-model="selectedCar">
  
<option ng-repeat="x in cars" ng-value="{{x}}">{{x.model}}</option>
</select>

<h1>You selected a {{selectedCar.color}} {{selectedCar.model}}</h1>


Example

Using ng-options:

<select ng-model="selectedCar" ng-options="x.model for x in cars">
</select>

<h1>You selected: {{selectedCar.model}}</h1>
<p>Its color is: {{selectedCar.color}}</p>


When the selected value is an object, it can hold more information, and your application can be more flexible.

We will use the ng-options directive in this tutorial.


The Data Source as an Object

In the previous examples the data source was an array, but we can also use an object.

Assume you have an object with key-value pairs:

$scope.cars = {
  car01 : 
"Ford",
  car02 : 
"Fiat",
  car03 : 
"Volvo"
};

The expression in the ng-options attribute is a bit different for objects:

Example


<select ng-model="selectedCar" ng-options="x for (x, y) in cars">
</select>


AngularJS Select
 

AngularJS is perfect for displaying data from a Database. Just make sure the data is in JSON format.


Fetching Data From a PHP Server Running MySQL

AngularJS Example

<div ng-app="myApp" ng-controller="customersCtrl">

<table>
  
<tr ng-repeat="x in names">
    
<td>{{ x.Name }}</td>
    
<td>{{ x.Country }}</td>
  
</tr>
</table>

</div>

<script>
var app = angular.module('myApp', []);
app.controller('customersCtrl'function($scope, $http) {
  $http.get("customers_mysql.php")
  .then(function (response) {$scope.names = response.data.records;});
});
</script>


Fetching Data From an ASP.NET Server Running SQL

AngularJS Example

<div ng-app="myApp" ng-controller="customersCtrl">

<table>
  
<tr ng-repeat="x in names">
    
<td>{{ x.Name }}</td>
    
<td>{{ x.Country }}</td>
  
</tr>
</table>

</div>

<script>
var app = angular.module('myApp', []);
app.controller('customersCtrl'function($scope, $http) {
  $http.get("customers_sql.aspx")
  .then(function (response) {$scope.names = response.data.records;});
});
</script>


Server Code Examples

The following section is a listing of the server code used to fetch SQL data.

  1. Using PHP and MySQL. Returning JSON.
  2. Using PHP and MS Access. Returning JSON.
  3. Using ASP.NET, VB, and MS Access. Returning JSON.
  4. Using ASP.NET, Razor, and SQL Lite. Returning JSON.

Cross-Site HTTP Requests

A request for data from a different server (other than the requesting page), are called cross-site HTTP requests.

Cross-site requests are common on the web. Many pages load CSS, images, and scripts from different servers.

In modern browsers, cross-site HTTP requests from scripts are restricted to same site for security reasons.

The following line, in our PHP examples, has been added to allow cross-site access.

header("Access-Control-Allow-Origin: *");

1. Server Code PHP and MySQL

<?php
header("Access-Control-Allow-Origin: *");
header("Content-Type: application/json; charset=UTF-8");

$conn = new mysqli("myServer""myUser""myPassword""Northwind");

$result = $conn->query("SELECT CompanyName, City, Country FROM Customers");

$outp = "";
while($rs = $result->fetch_array(MYSQLI_ASSOC)) {
  if ($outp != "") {$outp .= ",";}
  $outp .= '{"Name":"'  . $rs["CompanyName"] . '",';
  $outp .= '"City":"'   . $rs["City"]        . '",';
  $outp .= '"Country":"'. $rs["Country"]     . '"}';
}
$outp ='{"records":['.$outp.']}';
$conn->close();

echo($outp);
?>


2. Server Code PHP and MS Access

<?php
header("Access-Control-Allow-Origin: *"
);
header("Content-Type: application/json; charset=ISO-8859-1"
);

$conn = new
 COM("ADODB.Connection");
$conn->open("PROVIDER=Microsoft.Jet.OLEDB.4.0;Data Source=Northwind.mdb"
);

$rs = $conn->execute("SELECT CompanyName, City, Country FROM Customers"
);

$outp = ""
;
while (!$rs->EOF) {
  if
 ($outp != "") {$outp .= ",";}
  $outp .= '{"Name":"'
  . $rs["CompanyName"] . '",';
  $outp .= '"City":"'
   . $rs["City"]        . '",';
  $outp .= '"Country":"'
. $rs["Country"]     . '"}';
  $rs->MoveNext();
}
$outp ='{"records":['
.$outp.']}';

$conn->close();

echo ($outp);
?>


3. Server Code ASP.NET, VB and MS Access

<%@ Import Namespace="System.IO"%>
<%@ Import Namespace="System.Data"%>
<%@ Import Namespace="System.Data.OleDb"%>
<%
Response.AppendHeader("Access-Control-Allow-Origin", "*")
Response.AppendHeader("Content-type", "application/json")
Dim conn As OleDbConnection
Dim objAdapter As OleDbDataAdapter
Dim objTable As DataTable
Dim objRow As DataRow
Dim objDataSet As New DataSet()
Dim outp
Dim c
conn = New OledbConnection("Provider=Microsoft.Jet.OLEDB.4.0;data source=Northwind.mdb")
objAdapter = New OledbDataAdapter("SELECT CompanyName, City, Country FROM Customers", conn)
objAdapter.Fill(objDataSet, "myTable")
objTable=objDataSet.Tables("myTable")

outp = ""
c = chr(34)
for each x in objTable.Rows
if outp <> "" then outp = outp & ","
outp = outp & "{" & c & "Name"    & c & ":" & c & x("CompanyName") & c & ","
outp = outp &       c & "City"    & c & ":" & c & x("City")        & c & ","
outp = outp &       c & "Country" & c & ":" & c & x("Country")     & c & "}"
next

outp ="{" & c & "records" & c & ":[" & outp & "]}"
response.write(outp)
conn.close
%>


4. Server Code ASP.NET, Razor C# and SQL Lite

@{
Response.AppendHeader("Access-Control-Allow-Origin", "*")
Response.AppendHeader("Content-type", "application/json")
var db = Database.Open("Northwind");
var query = db.Query("SELECT CompanyName, City, Country FROM Customers");
var outp =""
var c = chr(34)
}
@foreach(var row in query){
if (outp != "") {outp = outp + ","}
outp = outp + "{" + c + "Name"    + c + ":" + c + @row.CompanyName + c + ","
outp = outp +       c + "City"    + c + ":" + c + @row.City        + c + ","
outp = outp +       c + "Country" + c + ":" + c + @row.Country     + c + "}"
}
outp ="{" + c + "records" + c + ":[" + outp + "]}"
@outp


AngularJS SQL
 

AngularJS has directives for binding application data to the attributes of HTML DOM elements.


The ng-disabled Directive

The ng-disabled directive binds AngularJS application data to the disabled attribute of HTML elements.

AngularJS Example

<div ng-app="" ng-init="mySwitch=true">

<p>
<button ng-disabled="mySwitch">Click Me!</button>
</p>

<p>
<input type="checkbox" ng-model="mySwitch">Button
</p>

<p>
{{ mySwitch }}
</p>

</div>

Application explained:

The ng-disabled directive binds the application data mySwitch to the HTML button's disabled attribute.

The ng-model directive binds the value of the HTML checkbox element to the value of mySwitch.

If the value of mySwitch evaluates to true, the button will be disabled:

<p>
<button disabled>Click Me!</button>
</p>

If the value of mySwitch evaluates to false, the button will not be disabled: 

<p>
<button>Click Me!</button>
</p>


The ng-show Directive

The ng-show directive shows or hides an HTML element.

AngularJS Example

<div ng-app="">

<p ng-show="true">I am visible.</p>

<p ng-show="false">I am not visible.</p>

</div>

The ng-show directive shows (or hides) an HTML element based on the  value of ng-show.

You can use any expression that evaluates to true or false:

AngularJS Example


<div ng-app="" ng-init="hour=13">

<p ng-show="hour > 12">I am visible.</p>

</div>

In the next chapter, there are more examples, using the click of a button to hide HTML elements.


The ng-hide Directive

The ng-hide directive hides or shows an HTML element.

AngularJS Example

<div ng-app="">

<p ng-hide="true">I am not visible.</p>

<p ng-hide="false">I am visible.</p>

</div>

AngularJS DOM
 

AngularJS has its own HTML events directives.


AngularJS Events

You can add AngularJS event listeners to your HTML elements by using one or more of these directives:

  • ng-blur
  • ng-change
  • ng-click
  • ng-copy
  • ng-cut
  • ng-dblclick
  • ng-focus
  • ng-keydown
  • ng-keypress
  • ng-keyup
  • ng-mousedown
  • ng-mouseenter
  • ng-mouseleave
  • ng-mousemove
  • ng-mouseover
  • ng-mouseup
  • ng-paste

The event directives allows us to run AngularJS functions at certain user events.

An AngularJS event will not overwrite an HTML event, both events will be executed.


Mouse Events

Mouse events occur when the cursor moves over an element, in this order:

  1. ng-mouseover
  2. ng-mouseenter
  3. ng-mousemove
  4. ng-mouseleave

Or when a mouse button is clicked on an element, in this order:

  1. ng-mousedown
  2. ng-mouseup
  3. ng-click

You can add mouse events on any HTML element.

Example

Increase the count variable when the mouse moves over the H1 element:

<div ng-app="myApp" ng-controller="myCtrl">

<h1 ng-mousemove="count = count + 1">Mouse over me!</h1>

<h2>{{ count }}</h2>

</div>
<script>
var app = angular.module('myApp', []);
app.controller('myCtrl'function($scope) {
  $scope.count = 0;
});
</script>


The ng-click Directive

The ng-click directive defines AngularJS code that will be executed when the element is being clicked.

Example

<div ng-app="myApp" ng-controller="myCtrl">

<button ng-click="count = count + 1">Click me!</button>

<p>{{ count }}</p>

</div>
<script>
var app = angular.module('myApp', []);
app.controller('myCtrl'function($scope) {
  $scope.count = 0;
});
</script>


You can also refer to a function:

Example

<div ng-app="myApp" ng-controller="myCtrl">

<button ng-click="myFunction()">Click me!</button>

<p>{{ count }}</p>

</div>
<script>
var app = angular.module('myApp', []);
app.controller('myCtrl'function($scope) {
  $scope.count = 0;
  $scope.myFunction = function() {
    $scope.count++;
  }
});
</script>


Toggle, True/False

If you want to show a section of HTML code when a button is clicked, and hide when the button is clicked again, like a dropdown menu, make the button behave like a toggle switch:

Menu:

Pizza
Pasta
Pesce

Example

<div ng-app="myApp" ng-controller="myCtrl">

<button ng-click="myFunc()">Click Me!</button>

<div ng-show="showMe">
  
<h1>Menu:</h1>
  
<div>Pizza</div>
  
<div>Pasta</div>
  
<div>Pesce</div>
</div>

</div>
<script>
var app = angular.module('myApp', []);
app.controller('myCtrl'function($scope) {
  $scope.showMe = false;
  $scope.myFunc = function() {
    $scope.showMe = !$scope.showMe;
  }
});
</script>

The showMe variable starts out as the Boolean value false.

The myFunc function sets the showMe variable to the opposite of what it is, by using the ! (not) operator.


$event Object

You can pass the $event object as an argument when calling the function.

The $event object contains the browser's event object:

AngularJS Events
 

Forms in AngularJS provides data-binding and validation of input controls.


Input Controls

Input controls are the HTML input elements:

  • input elements
  • select elements
  • button elements
  • textarea elements

Data-Binding

Input controls provides data-binding by using the ng-model directive.

<input type="text" ng-model="firstname">

The application does now have a property named firstname.

The ng-model directive binds the input controller to the rest of your application.

The property firstname, can be referred to in a controller:

Example

<script>
var app = angular.module('myApp', []);
app.controller(
'formCtrl'function($scope) {
  $scope.firstname = 
"John";
});
</script>


It can also be referred to elsewhere in the application:

Example

<form>
  First Name: 
<input type="text" ng-model="firstname">
</form>

<h1>You entered: {{firstname}}</h1>


Checkbox

A checkbox has the value true or false. Apply the ng-model directive to a checkbox, and use its value in your application.

Example

Show the header if the checkbox is checked:

 <form>
  Check to show a header:
  
<input type="checkbox" ng-model="myVar">
</form>

<h1 ng-show="myVar">My Header</h1>


Radiobuttons

Bind radio buttons to your application with the ng-model directive.

Radio buttons with the same ng-model can have different values, but only the selected one will be used.

Example

Display some text, based on the value of the selected radio button:

<form>
  Pick a topic:
  
<input type="radio" ng-model="myVar" value="dogs">Dogs
  
<input type="radio" ng-model="myVar" value="tuts">Tutorials
  
<input type="radio" ng-model="myVar" value="cars">Cars
</form>

The value of myVar will be either dogstuts, or cars.


Selectbox

Bind select boxes to your application with the ng-model directive.

The property defined in the ng-model attribute will have the value of the selected option in the selectbox.

 Example

Display some text, based on the value of the selected option:

<form>
  Select a topic:
  
<select ng-model="myVar">
    
<option value="">
    
<option value="dogs">Dogs
    
<option value="tuts">Tutorials
    
<option value="cars">Cars
  
</select>
</form>

The value of myVar will be either dogstuts, or cars.


An AngularJS Form Example

First Name:

Last Name:


form = {"firstName":"John","lastName":"Doe"}

master = {"firstName":"John","lastName":"Doe"}


Application Code

<div ng-app="myApp" ng-controller="formCtrl">
  
<form novalidate>
    First Name:
<br>
    
<input type="text" ng-model="user.firstName"><br>
    Last Name:
<br>
    
<input type="text" ng-model="user.lastName">
    
<br><br>
    
<button ng-click="reset()">RESET</button>
  
</form>
  
<p>form = {{user}}</p>
  
<p>master = {{master}}</p>
</div>

<script>
var app = angular.module('myApp', []);
app.controller('formCtrl'function($scope) {
  $scope.master = {firstName: "John", lastName: "Doe"};
  $scope.reset = function() {
    $scope.user = angular.copy($scope.master);
  };
  $scope.reset();
});
</script>

The novalidate attribute is new in HTML5. It disables any default browser validation.

Example Explained

The ng-app directive defines the AngularJS application.

The ng-controller directive defines the application controller.

The ng-model directive binds two input elements to the user object in the model.

The formCtrl co

AngularJS Forms

AngularJS can validate input data.


Form Validation

AngularJS offers client-side form validation.

AngularJS monitors the state of the form and input fields (input, textarea, select), and lets you notify the user about the current state.

AngularJS also holds information about whether they have been touched, or modified, or not.

You can use standard HTML5 attributes to validate input, or you can make your own validation functions.

Client-side validation cannot alone secure user input. Server side validation is also necessary.


Required

Use the HTML5 attribute required to specify that the input field must be filled out:

Example

The input field is required:

<form name="myForm">
  
<input name="myInput" ng-model="myInput" required>
</form>

<p>The input's valid state is:</p>
<h1>{{myForm.myInput.$valid}}</h1>


E-mail

Use the HTML5 type email to specify that the value must be an e-mail:

Example

The input field has to be an e-mail:

<form name="myForm">
  
<input name="myInput" ng-model="myInput" type="email">
</form>

<p>The input's valid state is:</p>
<h1>{{myForm.myInput.$valid}}</h1>


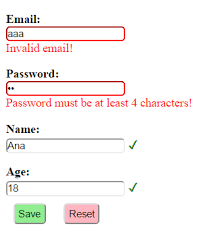
Form State and Input State

AngularJS is constantly updating the state of both the form and the input fields.

Input fields have the following states:

  • $untouched The field has not been touched yet
  • $touched The field has been touched
  • $pristine The field has not been modified yet
  • $dirty The field has been modified
  • $invalid The field content is not valid
  • $valid The field content is valid

They are all properties of the input field, and are either true or false.

Forms have the following states:

  • $pristine No fields have been modified yet
  • $dirty One or more have been modified
  • $invalid The form content is not valid
  • $valid The form content is valid
  • $submitted The form is submitted

They are all properties of the form, and are either true or false.

You can use these states to show meaningful messages to the user. Example, if a field is required, and the user leaves it blank, you should give the user a warning:

Example

Show an error message if the field has been touched AND is empty:

<input name="myName" ng-model="myName" required>
<span ng-show="myForm.myName.$touched && myForm.myName.$invalid">The name is required.</span>


CSS Classes

AngularJS adds CSS classes to forms and input fields depending on their states.

The following classes are added to, or removed from, input fields:

  • ng-untouched The field has not been touched yet
  • ng-touched The field has been touched
  • ng-pristine The field has not been  modified yet
  • ng-dirty The field has been modified
  • ng-valid The field content is valid
  • ng-invalid The field content is not valid
  • ng-valid-key One key for each validation. Example: ng-valid-required, useful when there are more than one thing that must be validated
  • ng-invalid-key Example: ng-invalid-required

The following classes are added to, or removed from, forms:

  • ng-pristine No fields has not been modified yet
  • ng-dirty One or more fields has been modified
  • ng-valid The form content is valid
  • ng-invalid The form content is not valid
  • ng-valid-key One key for each validation. Example: ng-valid-required, useful when there are more than one thing that must be validated
  • ng-invalid-key Example: ng-invalid-required

The classes are removed if the value they represent is false.

Add styles for these classes to give your application a better and more intuitive user interface.

Example

Apply styles, using standard CSS:

<style>

input.ng-invalid {
  background-color: pink;

}

input.ng-valid {
  background-color: lightgreen;

}


</style>

Forms can also be styled:

Example

Apply styles for unmodified (pristine) forms, and for modified forms:

<style>

form.ng-pristine {
  background-color: lightblue;

}

form.ng-dirty {
  background-color: pink;

}

</style>


Custom Validation

To create your own validation function is a bit more tricky; You have to add a new directive to your application, and deal with the validation inside a function with certain specified arguments.

Example

Create your own directive, containing a custom validation function, and refer to it by using my-directive.

The field will only be valid if the value contains the character "e":

<form name="myForm">
<input name="myInput" ng-model="myInput" required my-directive>
</form>

<script>

var app = angular.module('myApp', []);
app.directive('myDirective'
function() {
  return
 {
    require: 'ngModel'
,
    link: function
(scope, element, attr, mCtrl) {
      function
 myValidation(value) {
        if
 (value.indexOf("e") > -1) {
          mCtrl.$setValidity('charE'
true); AngularJS Validation

API stands for Application Programming Interface.


AngularJS Global API

The AngularJS Global API is a set of global JavaScript functions for performing common tasks like:

  • Comparing objects
  • Iterating objects
  • Converting data

The Global API functions are accessed using the angular object.

Below is a list of some common API functions:

API

Description

angular.lowercase()

Converts a string to lowercase

angular.uppercase()

Converts a string to uppercase

angular.isString()

Returns true if the reference is a string

angular.isNumber()

Returns true if the reference is a number


angular.lowercase()

Example

<div ng-app="myApp" ng-controller="myCtrl">
  
<p>{{ x1 }}</p>
  
<p>{{ x2 }}</p>
</div>

<script>
var app = angular.module('myApp', []);
app.controller('myCtrl'function($scope) {
  $scope.x1 = "JOHN";
  $scope.x2 = angular.lowercase($scope.x1);
});
</script>


angular.uppercase()

Example

<div ng-app="myApp" ng-controller="myCtrl">
  
<p>{{ x1 }}</p>
  
<p>{{ x2 }}</p>
</div>

<script>
var app = angular.module('myApp', []);
app.controller('myCtrl'function($scope) {
  $scope.x1 = "John";
  $scope.x2 = angular.uppercase($scope.x1);
});
</script>


angular.isString()

Example

<div ng-app="myApp" ng-controller="myCtrl">
  
<p>{{ x1 }}</p>
  
<p>{{ x2 }}</p>
</div>

<script>
var app = angular.module('myApp', []);
app.controller('myCtrl'function($scope) {
  $scope.x1 = "JOHN";
  $scope.x2 = angular.isString($scope.x1);
});
</script>


angular.isNumber()

Example

<div ng-app="myApp" ng-controller="myCtrl">
  
<p>{{ x1 }}</p>
  
<p>{{ x2 }}</p>
</div>

<script>
var app = angular.module('myApp', []);
app.controller('myCtrl'function($scope) {
  $scope.x1 = "JOHN";
  $scope.x2 = angular.isNumber($scope.x1);
});
</script>


AngularJS API

You can easily use w3.css style sheet together with AngularJS. This chapter demonstrates how.


W3.CSS

To include W3.CSS in your AngularJS application, add the following line to the head of your document:

<link rel="stylesheet" href="https://www.w3schools.com/w3css/4/w3.css">

If you want to study W3.CSS, visit our W3.CSS Tutorial.

Below is a complete HTML example, with all AngularJS directives and W3.CSS classes explained.


HTML Code

<!DOCTYPE html>
<html>
<link rel="stylesheet" href="https://www.w3schools.com/w3css/4/w3.css">
<script src="https://ajax.googleapis.com/ajax/libs/angularjs/1.6.9/angular.min.js"></script>
<body ng-app="myApp" ng-controller="userCtrl">

<div class="w3-container">

<h3>Users</h3>

<table class="w3-table w3-bordered w3-striped">
  
<tr>
    
<th>Edit</th>
    
<th>First Name</th>
    
<th>Last Name</th>
  
</tr>
  
<tr ng-repeat="user in users">
    
<td>
      
<button class="w3-btn w3-ripple" ng-click="editUser(user.id)">✎ Edit</button>
    
</td>
    
<td>{{ user.fName }}</td>
    
<td>{{ user.lName }}</td>
  
</tr>
</table>
<br>
<button class="w3-btn w3-green w3-ripple" ng-click="editUser('new')">✎ Create New User</button>

<form ng-hide="hideform">
  
<h3 ng-show="edit">Create New User:</h3>
  
<h3 ng-hide="edit">Edit User:</h3>
    
<label>First Name:</label>
    
<input class="w3-input w3-border" type="text" ng-model="fName" ng-disabled="!edit" placeholder="First Name">
  
<br>
    
<label>Last Name:</label>
    
<input class="w3-input w3-border" type="text" ng-model="lName" ng-disabled="!edit" placeholder="Last Name">
  
<br>
    
<label>Password:</label>
    
<input class="w3-input w3-border" type="password" ng-model="passw1" placeholder="Password">
  
<br>
    
<label>Repeat:</label>
    
<input class="w3-input w3-border" type="password" ng-model="passw2" placeholder="Repeat Password">
 
<br>
<button class="w3-btn w3-green w3-ripple" ng-disabled="error || incomplete">✔ Save Changes</button>
</form>

</div>

<script src= "myUsers.js"></script>

</body>
</html>


Directives (Used Above) Explained

AngularJS Directive

Description

<body ng-app

Defines an application for the <body> element

<body ng-controller

Defines a controller for the <body> element

<tr ng-repeat

Repeats the <tr> element for each user in users

<button ng-click

Invoke the function editUser() when the <button> element is clicked

<h3 ng-show

Show the <h3>s element if edit = true

<h3 ng-hide

Hide the form if hideform = true, and hide the <h3> element if edit = true

<input ng-model

Bind the <input> element to the application

<button ng-disabled

Disables the <button> element if error or incomplete = true


W3.CSS Classes Explained

Element

Class

Defines

<div>

w3-container

A content container

<table>

w3-table

A table

<table>

w3-bordered

A bordered table

<table>

<
AngularJS W3.CSS

With AngularJS, you can include HTML from an external file.


AngularJS Includes

With AngularJS, you can include HTML content using the ng-include directive:

Example

<body ng-app="">

<div ng-include="'myFile.htm'"></div>

</body>


Include AngularJS Code

The HTML files you include with the ng-include directive, can also contain AngularJS code:

myTable.htm:

<table>
  
<tr ng-repeat="x in names">
    
<td>{{ x.Name }}</td>
    
<td>{{ x.Country }}</td>
  
</tr>
</table>

Include the file "myTable.htm" in your web page, and all AngularJS code will be executed, even the code inside the included file:

Example

<body>

<div ng-app="myApp" ng-controller="customersCtrl">
  
<div ng-include="'myTable.htm'"></div>
</div>

<script>

var app = angular.module('myApp', []);
app.controller('customersCtrl'
function($scope, $http) {
  $http.get("customers.php"
).then(function (response) {
    $scope.names = response.data.records;
  });
});

</script>


Include Cross Domains

By default, the ng-include directive does not allow you to include files from other domains.

To include files from another domain, you can add a whitelist of legal files and/or domains in the config function of your application:

Example:

<body ng-app="myApp">

<div ng-include="'https://tryit.w3schools.com/angular_include.php'"></div>

<script>

var app = angular.module('myApp', [])
app.config(function
($sceDelegateProvider) {
  $sceDelegateProvider.resourceUrlWhitelist([
    'https://tryit.w3schools.com/**'

  ]);
});

</script>

</body>


Be sure that the server on the destination allows cross domain file access.


AngularJS Includes

AngularJS provides animated transitions, with help from CSS.


What is an Animation?

An animation is when the transformation of an HTML element gives you an illusion of motion.

Example:

Check the checkbox to hide the DIV:

<body ng-app="ngAnimate">

Hide the DIV: 
<input type="checkbox" ng-model="myCheck">

<div ng-hide="myCheck"></div>

</body>


Applications should not be filled with animations, but some animations can make the application easier to understand.


What do I Need?

To make your applications ready for animations, you must include the AngularJS Animate library:

<script src="https://ajax.googleapis.com/ajax/libs/angularjs/1.6.9/angular-animate.js"></script>


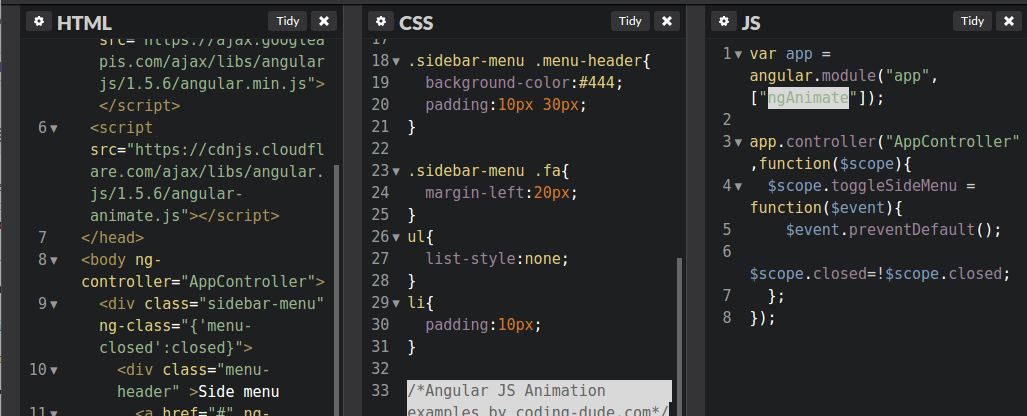
Then you must refer to the 
ngAnimate module in your application:

<body ng-app="ngAnimate">

Or if your application has a name, add ngAnimate as a dependency in your application module:

Example

<body ng-app="myApp">

<h1>Hide the DIV: <input type="checkbox" ng-model="myCheck"></h1>

<div ng-hide="myCheck"></div>

<script>

var app = angular.module('myApp', ['ngAnimate']);

</script>


What Does ngAnimate Do?

The ngAnimate module adds and removes classes.

The ngAnimate module does not animate your HTML elements, but when ngAnimate notice certain events, like hide or show of an HTML element, the element gets some pre-defined classes which can be used to make animations.

The directives in AngularJS who add/remove classes are:

  • ng-show
  • ng-hide
  • ng-class
  • ng-view
  • ng-include
  • ng-repeat
  • ng-if
  • ng-switch

The ng-show and ng-hide directives adds or removes a ng-hide class value.

The other directives adds a ng-enter class value when they enter the DOM, and a ng-leave attribute when they are removed from the DOM.

The ng-repeat directive also adds a ng-move class value when the HTML element changes position.

In addition, during the animation, the HTML element will have a set of class values, which will be removed when the animation has finished. Example: the ng-hide directive will add these class values:

  • ng-animate
  • ng-hide-animate
  • ng-hide-add (if the element will be hidden)
  • ng-hide-remove (if the element will be showed)
  • ng-hide-add-active (if the element will be hidden)
  • ng-hide-remove-active (if the element will be showed)

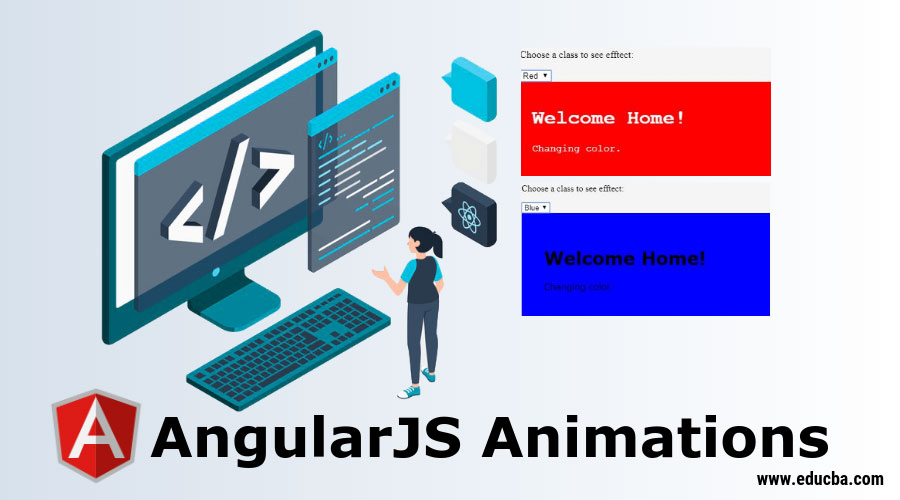
Animations Using CSS

We can use CSS transitions or CSS animations to animate HTML elements. This tutorial will show you both.

To learn more about CSS Animation, study our CSS Transition Tutorial and our CSS Animation Tutorial.


CSS Transitions

CSS transitions allows you to change CSS property values smoothly, from one value to another, over a given duration:

Example:

When the DIV element gets the .ng-hide class, the transition will take 0.5 seconds, and the height will smoothly change from 100px to 0:

<style>
div {
  transition: all linear 0.5s;

  background-color: lightblue;

  height: 100px;

}


.ng-hide {
  height: 0;

}
</style>


CSS Animations

CSS Animations allows you to change CSS property values smoothly, from one value to another, over a given duration:

Example:

When the DIV element gets the .ng-hide class, the myChange animation will run, which will smoothly change the height from 100px to 0:

<style>
@keyframes myChange {
  from {
    height: 100px;

  
} to {
    height: 0;

  
}
}


div {
  height: 100px;

  background-color: lightblue;

}

div.ng-hide {
  animation: 0.5s myChange;

}
</style>


AngularJS Animations

The ngRoute module helps your application to become a Single Page Application.


What is Routing in AngularJS?

If you want to navigate to different pages in your application, but you also want the application to be a SPA (Single Page Application), with no page reloading, you can use the ngRoute module.

The ngRoute module routes your application to different pages without reloading the entire application.

Example:

Navigate to "red.htm", "green.htm", and "blue.htm":

<body ng-app="myApp">

<p><a href="#/!">Main</a></p>

<a href="#!red">Red</a>
<a href="#!green">Green</a>
<a href="#!blue">Blue</a>

<div ng-view></div>

<script>
var app = angular.module("myApp", ["ngRoute"]);
app.config(function($routeProvider) {
  $routeProvider
  .when("/", {
    templateUrl : "main.htm"
  })
  .when("/red", {
    templateUrl : "red.htm"
  })
  .when("/green", {
    templateUrl : "green.htm"
  })
  .when("/blue", {
    templateUrl : "blue.htm"
  });
});
</script>

</body>


What do I Need?

To make your applications ready for routing, you must include the AngularJS Route module:

<script src="https://ajax.googleapis.com/ajax/libs/angularjs/1.6.9/angular-route.js"></script>

Then you must add the ngRoute as a dependency in the application module:

var app = angular.module("myApp", ["ngRoute"]);

Now your application has access to the route module, which provides the $routeProvider.

Use the $routeProvider to configure different routes in your application:

app.config(function($routeProvider) {
  $routeProvider
  .when("/"
, {
    templateUrl : "main.htm"

  })
  .when("/red"
, {
    templateUrl : "red.htm"

  })
  .when("/green"
, {
    templateUrl : "green.htm"

  })
  .when("/blue"
, {
    templateUrl : "blue.htm"

  });
});


Where Does it Go?

Your application needs a container to put the content provided by the routing.

This container is the ng-view directive.

There are three different ways to include the ng-view directive in your application:

Example:

<div ng-view></div>

Example:

<ng-view></ng-view>

Example:

<div class="ng-view"></div>

Applications can only have one ng-view directive, and this will be the placeholder for all views provided by the route.


$routeProvider

With the $routeProvider you can define what page to display when a user clicks a link.

Example:

Define a $routeProvider:

var app = angular.module("myApp", ["ngRoute"]);
app.config(function
($routeProvider) {
  $routeProvider
  .when("/"
, {
    templateUrl : "main.htm"

  })
  .when("/london"
, {
    templateUrl : "london.htm"

  })
  .when("/paris"
, {
    templateUrl : "paris.htm"

  });
});

Define the $routeProvider using the config method of your application. Work registered in the config method will be performed when the application is loading.


Controllers

With the $routeProvider you can also define a controller for each "view".

Example:

Add controllers:

var app = angular.module("myApp", ["ngRoute"]);
app.config(function
($routeProvider) {
  $routeProvider
  .when("/"
, {
    templateUrl : "main.htm"

  })
  .when("/london"
, {
    templateUrl : "london.htm"
,
    controller : "londonCtrl"

  })
  .when("/paris"
, {
    templateUrl : "paris.htm"
,
    controller : "parisCtrl"

  });
});
app.controller("londonCtrl"
function ($scope) {
  $scope.msg = "I love London"
;
});
app.controller("parisCtrl"
function ($scope) {
  $scope.msg = "I love Paris"
;
});

The "london.htm" and "paris.htm" are normal HTML files, which you can add AngularJS expressions as you would with any other HTML sections of your AngularJS application.

The files looks like this:

london.htm

<h1>London</h1>
<h3>London is the capital city of England.</h3>
<p>It is the most populous city in the United Kingdom, with a metropolitan area of over 13 million inhabitants.</p>
<p>{{msg}}</p>

paris.htm

<h1>Paris</h1>
<h3>Paris is the capital city of France.</h3>
<p>The Paris area is one of the largest population centers in Europe, with more than 12 million inhabitants.</p>
<p>{{msg}}</p>


Template

In the previous examples we have used the templateUrl property in the $routeProvider.when method.

You can also use the template property, which allows you to write HTML directly in the property value, and not refer to a page.

Example:

Write templates:

var app = angular.module("myApp", [

AngularJS Routing
 

It is time to create a real AngularJS Application.


Make a Shopping List

Lets use some of the AngularJS features to make a shopping list, where you can add or remove items:

My Shopping List

  • {{x}}×

{{errortext}}


Application Explained

Step 1. Getting Started:

Start by making an application called myShoppingList, and add a controller named myCtrl to it.

The controller adds an array named products to the current $scope.

In the HTML, we use the ng-repeat directive to display a list using the items in the array.

Example

So far we have made an HTML list based on the items of an array:

<script>

var app = angular.module("myShoppingList", []);
app.controller(
"myCtrl"function($scope) {
  $scope.products = [
"Milk""Bread""Cheese"];
});

</script>

<div ng-app="myShoppingList" ng-controller="myCtrl">
  
<ul>
    
<li ng-repeat="x in products">{{x}}</li>
  
</ul>
</div>


Step 2. Adding Items:

In the HTML, add a text field, and bind it to the application with the ng-model directive.

In the controller, make a function named addItem, and use the value of the addMe input field to add an item to the products array.

Add a button, and give it an ng-click directive that will run the addItem function when the button is clicked.

Example

Now we can add items to our shopping list:

<script>

var app = angular.module("myShoppingList", []);
app.controller(
"myCtrl"function($scope) {
  $scope.products = [
"Milk""Bread""Cheese"];
  $scope.addItem = 
function () {
    $scope.products.push($scope.addMe);
  }

});

</script>

<div ng-app="myShoppingList" ng-controller="myCtrl">
  
<ul>
    
<li ng-repeat="x in products">{{x}}</li>
  
</ul>
  
<input ng-model="addMe">
  
<button ng-click="addItem()">Add</button>
</div>


Step 3. Removing Items:

We also want to be able to remove items from the shopping list.

In the controller, make a function named removeItem, which takes the index of the item you want to remove, as a parameter.

In the HTML, make a element for each item, and give them an ng-click directive which calls the removeItem function with the current $index.

Example

Now we can remove items from our shopping list:

<script>

var app = angular.module("myShoppingList", []);
app.controller(
"myCtrl"function($scope) {
  $scope.products = [
"Milk""Bread""Cheese"];
  $scope.addItem = 
function () {
    $scope.products.push($scope.addMe);
  }
  $scope.removeItem = 
function (x) {
    $scope.products.splice(x, 
1);
  }

});

</script>

<div ng-app="myShoppingList" ng-controller="myCtrl">
  
<ul>
    
<li ng-repeat="x in products">
      
{{x}}<span ng-click="removeItem($index)">&times;</span>
    
</li>
  
</ul>
  
<input ng-model="addMe">
  
<button ng-click="addItem()">Add</button>
</div>


Step 4. Error Handling:

The application has some errors, like if you try to add the same item twice, the application crashes. Also, it should not be allowed to add empty items.

We will fix that by checking the value before adding new items.

In the HTML, we will add a container for error messages, and write an error message when someone tries to add an existing item.

Example

A shopping list, with the possibility to write error messages:

<script>

var app = angular.module("myShoppingList", []);
app.controller(
"myCtrl"function($scope) {
  $scope.products = [
"Milk""Bread""Cheese"];
  $scope.addItem = 
function () {
    $scope.errortext = 
"";
    
if (!$scope.addMe) {return;}
    
if ($scope.products.indexOf($scope.addMe) == -1) {
      $scope.products.push($scope.addMe);
    } 
else {
      $scope.errortext = 
"The item is already in your shopping list.";
    }
  }
  $scope.removeItem = 
function (x) {
    $scope.errortext = 
"";
    $scope.products.splice(x, 1);
  }
});

</script

AngularJS Application

Try it Yourself

You can edit the examples online, and click on a button to view the result.

AngularJS Example

<div ng-app="">

<p>Name: <input type="text" ng-model="name"></p>
<p>You wrote: {{ name }}</p>

</div>

AngularJS Basics


AngularJS Expressions


AngularJS Modules


AngularJS Directives


AngularJS Models


AngularJS Controllers


AngularJS Scopes


AngularJS Filters


AngularJS XMLHttpRequest


AngularJS Tables


AngularJS - Reading from SQL Resources


AngularJS HTML DOM


AngularJS Events


AngularJS Forms


AngularJS API


AngularJS W3.CSS


AngularJS Includes


AngularJS Animations


AngularJS Applications


Directive

Description

ng-app

Defines the root element of an application.

ng-bind

Binds the content of an HTML element to application data.

ng-bind-html

Binds the innerHTML of an HTML element to application data, and also removes dangerous code from the HTML string.

ng-bind-template

Specifies that the text content should be replaced with a template.

ng-blur

Specifies a behavior on blur events.

ng-change

Specifies an expression to evaluate when content is being changed by the user.

ng-checked

Specifies if an element is checked or not.

ng-class

Specifies CSS classes on HTML elements.

ng-class-even

Same as ng-class, but will only take effect on even rows.

ng-class-odd

Same as ng-class, but will only take effect on odd rows.

ng-click

Specifies an expression to evaluate when an element is being clicked.

ng-cloak

Prevents flickering when your application is being loaded.

ng-controller

Defines the controller object for an application.

ng-copy

Specifies a behavior on copy events.

ng-csp

Changes the content security policy.

ng-cut

Specifies a behavior on cut events.

ng-dblclick

Specifies a behavior on double-click events.

ng-disabled

Specifies if an element is disabled or not.

ng-focus

Specifies a behavior on focus events.

ng-form

Specifies an HTML form to inherit controls from.

ng-hide

Hides or shows HTML elements.

ng-href

Specifies a url for the <a> element.

ng-if

Removes the HTML element if a condition is false.

ng-include

Includes HTML in an application.

ng-init

Defines initial values for an application.

ng-jq

Specifies that the application must use a library, like jQuery.

ng-keydown

Specifies a behavior on keydown events.

ng-keypress

Specifies a behavior on keypress events.

ng-keyup

Specifies a behavior on keyup events.

ng-list

Converts text into a list (array).

ng-maxlength

Specifies the maximum number of characters allowed in the input field.

ng-minlength

Specifies the minimum number of characters allowed in the input field.

ng-model

Binds the value of HTML controls to application data.

ng-model-options

Specifies how updates in the model are done.

ng-mousedown

Specifies a behavior on mousedown events.

ng-mouseenter

Specifies a behavior on mouseenter events.

ng-mouseleave

Specifies a behavior on mouseleave events.

ng-mousemove

Specifies a behavior on mousemove events.

ng-mouseover

Specifies a behavior on mouseover events.

ng-mouseup

Specifies a behavior on mouseup events.

ng-non-bindable

Specifies that no data binding can happen in this element, or its children.

ng-open

Specifies the open attribute of an element.

ng-options

Specifies <options> in a <select> list.

ng-paste

Specifies a behavior on paste events.

ng-pluralize

Specifies a message to display according to en-us localization rules.

ng-readonly

Specifies the readonly attribute of an element.

ng-repeat

Defines a template for each data in a collection.

ng-required

Specifies the required attribute of an element.

ng-selected

Specifies the selected attribute of an element.

ng-show

Shows or hides HTML elements.

ng-src

Specifies the src attribute for the <img> element.

ng-srcset

Specifies the srcset attribute for the <img> element.

ng-style

Specifies the style attribute for an element.

AngularJS Reference


Login
ADS CODE