Kotlin Data Types
Kotlin Data Types
In Kotlin, the type of a variable is decided by its value:
Example
val myNum = 5 // Int
val myDoubleNum = 5.99 // Double
val myLetter = 'D' // Char
val myBoolean = true // Boolean
val myText = "Hello" // String
However, you learned from the previous chapter that it is possible to specify the type if you want:
Example
val myNum: Int = 5 // Int
val myDoubleNum: Double = 5.99 // Double
val myLetter: Char = 'D' // Char
val myBoolean: Boolean = true // Boolean
val myText: String = "Hello" // String
Sometimes you have to specify the type, and often you don't. Anyhow, it is good to know what the different types represent.
You will learn more about when you need to specify the type later.
Data types are divided into different groups:
- Numbers
- Characters
- Booleans
- Strings
- Arrays
Numbers
Number types are divided into two groups:
Integer types store whole numbers, positive or negative (such as 123 or -456), without decimals. Valid types are Byte,
Short, Int and Long.
Floating point types represent numbers with a fractional part, containing one or more decimals. There are two types:
Float and Double.
If you don't specify the type for a numeric variable, it is most often returned as Int for whole numbers and Double for floating point numbers.
Integer Types
Byte
The Byte data type can store whole numbers from -128 to 127. This can be used instead of Int or other integer types to save memory when you are certain that the value will be within -128 and 127:
Example
val myNum: Byte = 100
println(myNum)
Short
The Short data type can store whole numbers from -32768 to 32767:
Example
val myNum: Short = 5000
println(myNum)
Int
The Int data type can store whole numbers from -2147483648 to 2147483647:
Example
val myNum: Int = 100000
println(myNum)
Long
The Long data type can store whole numbers from -9223372036854775807 to 9223372036854775807. This is used when Int is not large enough to store the value. Optionally, you can end the value with an "L":
Example
val myNum: Long = 15000000000L
println(myNum)
Difference Between Int and Long
A whole number is an Int as long as it is up to 2147483647. If it goes beyond that, it is defined as Long:
Example
val myNum1 = 2147483647 // Int
val myNum2 = 2147483648 // Long
Floating Point Types
Floating point types represent numbers with a decimal, such as 9.99 or 3.14515.
The Float and Double data types can store fractional numbers:
Float Example
val myNum: Float = 5.75F
println(myNum)
Double Example
val myNum: Double = 19.99
println(myNum)
Use Float or Double?
The precision of a floating point value indicates how many digits the value can have after the decimal point. The precision of Float is only six or seven decimal digits, while Double variables have a precision of about 15 digits. Therefore it is safer to use Double for most calculations.
Also note that you should end the value of a Float type with an "F".
Scientific Numbers
A floating point number can also be a scientific number with an "e" or "E" to indicate the power of 10:
Example
val myNum1: Float = 35E3F
val myNum2: Double = 12E4
println(myNum1)
println(myNum2)
Booleans
The Boolean data type and can only take the values true or false:
Example
val isKotlinFun: Boolean = true
val isFishTasty: Boolean = false
println(isKotlinFun) // Outputs true
println(isFishTasty) // Outputs false
Boolean values are mostly used for conditional testing, which you will learn more about in a later chapter.
Characters
The Char data type is used to store a single character. A char value must be surrounded by single quotes, like 'A' or 'c':
Example
val myGrade: Char = 'B'
println(myGrade)
Unlike Java, you cannot use ASCII values to display certain characters. The value 66 would output a "B" in Java, but will generate an error in Kotlin:
Example
val myLetter: Char = 66
println(myLetter) // Error
Strings
The String data type is used to store a sequence of characters (text). String values must be surrounded by double quotes:
Example
val myText: String = "Hello World"
println(myText)
You will learn more about strings in .
Arrays
Arrays are used to store multiple values in a single variable, instead of declaring separate variables for each value.
You will learn more about arrays in .
Type Conversion
Type conversion is when you convert the value of one data type to another type.
In Kotlin, numeric type conversion is different from . For example, it is not possible to convert an Int type to a Long type with the following code:
Example
val x: Int = 5
val y: Long = x
println(y) // Error: Type mismatch
To convert a numeric data type to another type, you must use one of the following functions: toByte(), toShort(), toInt(), toLong(), toFloat(), toDouble() or toChar():
Example
val x: Int = 5
val y: Long = x.toLong()
println(y)
Kotlin Operators
Kotlin Operators
Operators are used to perform operations on variables and values.
The value is called an operand, while the operation (to be performed between the two operands) is defined by an operator:
| Operand |
Operator |
Operand |
| 100 |
+ |
50 |
In the example below, the numbers 100 and 50 are operands, and the + sign is an operator:
Although the + operator is often used to add together two values, like in the example above, it can also be used to add together a variable and a value, or a variable and a variable:
Example
var sum1 = 100 + 50 // 150 (100 + 50)
var sum2 = sum1 + 250 // 400 (150 + 250)
var sum3 = sum2 + sum2 // 800 (400 + 400)
Kotlin divides the operators into the following groups:
- Arithmetic operators
- Assignment operators
- Comparison operators
- Logical operators
Arithmetic Operators
Arithmetic operators are used to perform common mathematical operations.
| Operator |
Name |
Description |
Example |
Try it |
| + |
Addition |
Adds together two values |
x + y |
|
| - |
Subtraction |
Subtracts one value from another |
x - y |
|
| * |
Multiplication |
Multiplies two values |
x * y |
|
| / |
Division |
Divides one value from another |
x / y |
|
| % |
Modulus |
Returns the division remainder |
x % y |
|
| ++ |
Increment |
Increases the value by 1 |
++x |
|
| -- |
Decrement |
Decreases the value by 1 |
--x |
|
Kotlin Assignment Operators
Assignment operators are used to assign values to variables.
In the example below, we use the assignment operator (=) to assign the value 10 to a variable called x:
The addition assignment operator (+=) adds a value to a variable:
Example
var x = 10
x += 5
A list of all assignment operators:
| Operator |
Example |
Same As |
Try it |
| = |
x = 5 |
x = 5 |
|
| += |
x += 3 |
x = x + 3 |
|
| -= |
x -= 3 |
x = x - 3 |
|
| *= |
x *= 3 |
x = x * 3 |
|
| /= |
x /= 3 |
x = x / 3 |
|
| %= |
x %= 3 |
x = x % 3 |
|
Kotlin Comparison Operators
Comparison operators are used to compare two values, and returns a Boolean value: either true or false.
| Operator |
Name |
Example |
Try it |
| == |
Equal to |
x == y |
|
| != |
Not equal |
x != y |
|
| > |
Greater than |
x > y |
|
| < |
Less than |
x < y |
|
| >= |
Greater than or equal to |
x >= y |
|
| <= |
Less than or equal to |
x <= y |
|
You will learn much more about Booleans in the chapter and .
Kotlin Logical Operators
Logical operators are used to determine the logic between variables or values:
| Operator |
Name |
Description |
Example |
Try it |
| && |
Logical and |
Returns true if both statements are true |
x < 5 && x < 10 |
|
| || |
Logical or |
Returns true if one of the statements is true |
x < 5 || x < 4 |
|
| ! |
Logical not |
Reverse the result, returns false if the result is true |
|
|
Kotlin Strings
Kotlin Strings
Strings are used for storing text.
A string contains a collection of characters surrounded by double quotes:
Example
var greeting = "Hello"
Unlike , you do not have to specify that the variable should be a String. Kotlin is smart enough to understand that the greeting variable in the example above is a String because of the double quotes.
However, just like with other data types, you can specify the type if you insist:
Example
var greeting: String = "Hello"
Note: If you want to create a String without assigning the value (and assign the value later), you must specify the type while declaring the variable:
Example
This works fine:
var name: String
name = "John"
println(name)
Example
This will generate an error:
var name
name = "John"
println(name)
Access a String
To access the characters (elements) of a string, you must refer to the index number inside square brackets.
String indexes start with 0. In the example below, we access the first and third element in
txt:
Example
var txt = "Hello World"
println(txt[0]) // first element (H)
println(txt[2]) // third element (l)
[0] is the first element. [1] is the second element, [2] is the third element, etc.
String Length
A String in Kotlin is an object, which contain properties and functions that can perform certain operations on strings, by writing a dot character (.) after the specific string variable. For example, the length of a string can be found with the length property:
Example
var txt = "ABCDEFGHIJKLMNOPQRSTUVWXYZ"
println("The length of the txt string is: " + txt.length)
String Functions
There are many string functions available, for example toUpperCase() and toLowerCase():
Example
var txt = "Hello World"
println(txt.toUpperCase()) // Outputs "HELLO WORLD"
println(txt.toLowerCase()) // Outputs "hello world"
Comparing Strings
The compareTo(string) function compares two strings and returns 0 if both are equal:
Example
var txt1 = "Hello World"
var txt2 = "Hello World"
println(txt1.compareTo(txt2)) // Outputs 0 (they are equal)
Finding a String in a String
The indexOf() function returns the index (the position) of the first occurrence of a specified text in a string (including whitespace):
Example
var txt = "Please locate where 'locate' occurs!"
println(txt.indexOf("locate")) // Outputs 7
Remember that Kotlin counts positions from zero.
0 is the first position in a string, 1 is the second, 2 is the third ...
Quotes Inside a String
To use quotes inside a string, use single quotes ('):
Example
var txt1 = "It's alright"
var txt2 = "That's great"
String Concatenation
The + operator can be used between strings to add them together to make a new string. This is called concatenation:
Example
var firstName = "John"
var lastName = "Doe"
println(firstName + " " + lastName)
Note that we have added an empty text (" ") to create a space between firstName and lastName on print.
You can also use the plus() function to concatenate two strings:
Example
var firstName = "John "
var lastName = "Doe"
println(firstName.plus(lastName))
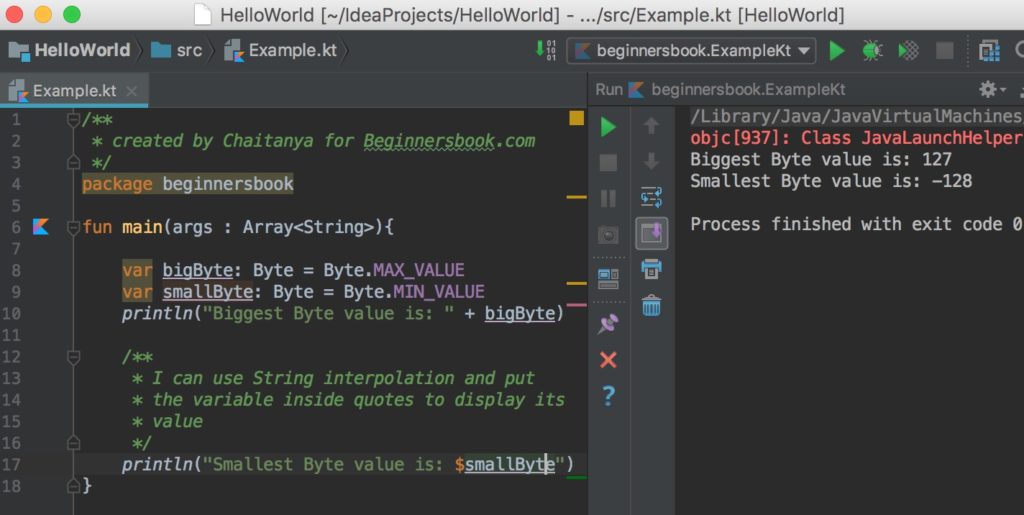
String Templates/Interpolation
Instead of concatenation, you can also use "string templates", which is an easy way to add variables and expressions inside a string.
Just refer to the variable with the $ symbol:
Example
var firstName = "John"
var lastName = "Doe"
println("My name is $firstName $lastName")
"String Templates" is a popular feature of Kotlin, as it reduces the amount of code. For example, you do not have to specify a whitespace between firstName and lastName, like we did in the concatenation example.
.png)
Kotlin Booleans
Kotlin Booleans
Very often, in programming, you will need a data type that can only have one of two values, like:
- YES / NO
- ON / OFF
- TRUE / FALSE
For this, Kotlin has a Boolean data type, which can take the values true or false.
Boolean Values
A boolean type can be declared with the Boolean keyword and can only take the values true or false:
Example
val isKotlinFun: Boolean = true
val isFishTasty: Boolean = false
println(isKotlinFun) // Outputs true
println(isFishTasty) // Outputs false
Just like you have learned with other data types in the previous chapters, the example above can also be written without specifying the type, as Kotlin is smart enough to understand that the variables are Booleans:
Example
val isKotlinFun = true
val isFishTasty = false
println(isKotlinFun) // Outputs true
println(isFishTasty) // Outputs false
Boolean Expression
A Boolean expression returns a Boolean value: true or false.
You can use a comparison operator, such as the greater than (>) operator to find out if an expression (or a variable) is true:
Example
val x = 10
val y = 9
println(x > y) // Returns true, because 10 is greater than 9
Or even easier:
Example
println(10 > 9) // Returns true, because 10 is greater than 9
In the examples below, we use the equal to (==) operator to evaluate an expression:
Example
val x = 10;
println(x == 10); // Returns true, because the value of x is equal to 10
Example
println(10 == 15); // Returns false, because 10 is not equal to 15
The Boolean value of an expression is the basis for all Kotlin comparisons and conditions.
You will learn more about conditions in the next chapter.

Kotlin If ... Else
Kotlin Conditions and If..Else
Kotlin supports the usual logical conditions from mathematics:
- Less than: a < b
- Less than or equal to: a <= b
- Greater than: a > b
- Greater than or equal to: a >= b
- Equal to a == b
- Not Equal to: a != b
You can use these conditions to perform different actions for different decisions.
Kotlin has the following conditionals:
- Use
if to specify a block of code to be executed, if a specified condition is true
- Use
else to specify a block of code to be executed, if the same condition is false
- Use
else if to specify a new condition to test, if the first condition is false
- Use
when to specify many alternative blocks of code to be executed
Note: Unlike Java, if..else can be used as a statement or as an expression (to assign a value to a variable) in Kotlin. See an example at the bottom of the page to better understand it.
Kotlin if
Use if to specify a block of code to be executed if a condition is true.
Syntax
if (condition) {
// block of code to be executed if the condition is true
}
Note that if is in lowercase letters. Uppercase letters (If or IF) will generate an error.
In the example below, we test two values to find out if 20 is greater than 18. If the condition is true, print some text:
Example
if (20 > 18) {
println("20 is greater than 18")
}
We can also test variables:
Example
val x = 20
val y = 18
if (x > y) {
println("x is greater than y")
}
Example explained
In the example above we use two variables, x and y, to test whether x is greater than y (using the > operator). As x is 20, and y is 18, and we know that 20 is greater than 18, we print to the screen that "x is greater than y".
Kotlin else
Use else to specify a block of code to be executed if the condition is false.
Syntax
if (condition) {
// block of code to be executed if the condition is true
} else {
// block of code to be executed if the condition is false
}
Example
val time = 20
if (time < 18) {
println("Good day.")
} else {
println("Good evening.")
}
// Outputs "Good evening."
Example explained
In the example above, time (20) is greater than 18, so the condition is false, so we move on to the else condition and print to the screen "Good evening". If the time was less than 18, the program would print "Good day".
Kotlin else if
Use else if to specify a new condition if the first condition is false.
Syntax
if (condition1) {
// block of code to be executed if condition1 is true
} else if (condition2) {
// block of code to be executed if the condition1 is false and condition2 is true
} else {
// block of code to be executed if the condition1 is false and condition2 is false
}
Example
val time = 22
if (time < 10) {
println("Good morning.")
} else if (time < 20) {
println("Good day.")
} else {
println("Good evening.")
}
// Outputs "Good evening."
Example explained
In the example above, time (22) is greater than 10, so the first condition is false. The next condition, in the else if statement, is also false, so we move on to the else condition since condition1 and condition2 is both false - and print to the screen "Good evening".
However, if the time was 14, our program would print "Good day."
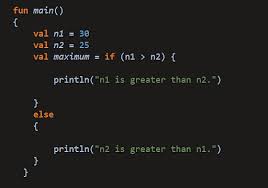
Kotlin If..Else Expressions
In Kotlin, you can also use if..else statements as expressions (assign a value to a variable and return it):
Example
val time = 20
val greeting = if (time < 18) {
"Good day."
} else {
"Good evening."
}
println(greeting)
When using if as an expression, you must also include else (required).
Note: You can ommit the curly braces {} when if has only one statement:
Example
fun main() {
val time = 20
val greeting = if (time < 18) "Good day." else "Good evening."
println(greeting)
}
Tip: This example is similar to the "ternary operator" (short hand if...else) in Java.
Kotlin When
Kotlin when
Instead of writing many if..else expressions, you can use the when expression, which is much easier to read.
It is used to select one of many code blocks to be executed:
Example
Use the weekday number to calculate the weekday name:
val day = 4
val result = when (day) {
1 -> "Monday"
2 -> "Tuesday"
3 -> "Wednesday"
4 -> "Thursday"
5 -> "Friday"
6 -> "Saturday"
7 -> "Sunday"
else -> "Invalid day."
}
println(result)
// Outputs "Thursday" (day 4)
The when expression is similar to the switch statement in Java.
This is how it works:
- The
when variable (day) is evaluated once
- The value of the day variable is compared with the values of each "branch"
- Each branch starts with a value, followed by an arrow (->) and a result
- If there is a match, the associated block of code is executed
else is used to specify some code to run if there is no match- In the example above, the value of
day is 4, meaning "Thursday" will be printed
.png)
Kotlin While Loop
Loops
Loops can execute a block of code as long as a specified condition is reached.
Loops are handy because they save time, reduce errors, and they make code more readable.
Kotlin While Loop
The while loop loops through a block of code as long as a specified condition is true:
Syntax
while (condition) {
// code block to be executed
}
In the example below, the code in the loop will run, over and over again, as long as the counter variable (i) is less than 5:
Example
var i = 0
while (i < 5) {
println(i)
i++
}
Note: Do not forget to increase the variable used in the condition, otherwise the loop will never end.
The Do..While Loop
The do..while loop is a variant of the while loop. This loop will execute the code block once, before checking if the condition is true, then it will repeat the loop as long as the condition is true.
Syntax
do {
// code block to be executed
}
while (condition);
The example below uses a do/while loop. The loop will always be executed at least once, even if the condition is false, because the code block is executed before the condition is tested:
Example
var i = 0
do {
println(i)
i++
}
while (i < 5)
Do not forget to increase the variable used in the condition, otherwise the loop will never end!
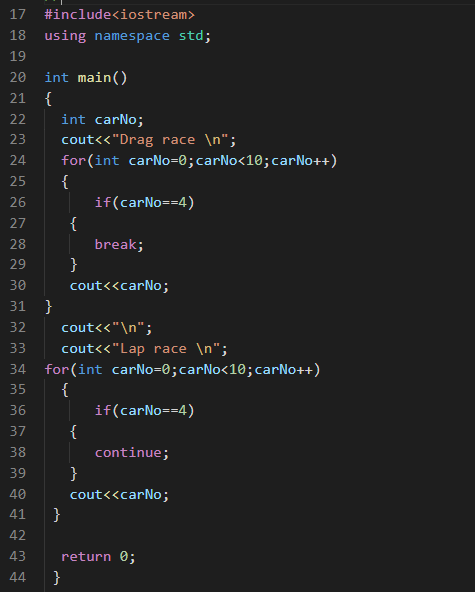
Kotlin Break and Continue
Kotlin Break
The break statement is used to jump out of a loop.
This example jumps out of the loop when i is equal to 4:
Example
var i = 0
while (i < 10) {
println(i)
i++
if (i == 4) {
break
}
}
Kotlin Continue
The continue statement breaks one iteration (in the loop), if a specified condition occurs, and continues with the next iteration in the loop.
This example skips the value of 4:
Example
var i = 0
while (i < 10) {
if (i == 4) {
i++
continue
}
println(i)
i++
}
Kotlin Arrays
Kotlin Arrays
Arrays are used to store multiple values in a single variable, instead of creating separate variables for each value.
To create an array, use the arrayOf() function, and place the values in a comma-separated list inside it:
val cars = arrayOf("Volvo", "BMW", "Ford", "Mazda")
Access the Elements of an Array
You can access an array element by referring to the index number, inside square brackets.
In this example, we access the value of the first element in cars:
Example
val cars = arrayOf("Volvo", "BMW", "Ford", "Mazda")
println(cars[0])
// Outputs Volvo
Note: Just like with Strings, Array indexes start with 0: [0] is the first element. [1] is the second element, etc.
Change an Array Element
To change the value of a specific element, refer to the index number:
Example
val cars = arrayOf("Volvo", "BMW", "Ford", "Mazda")
cars[0] = "Opel"
println(cars[0])
// Now outputs Opel instead of Volvo
Array Length / Size
To find out how many elements an array have, use the size property:
Example
val cars = arrayOf("Volvo", "BMW", "Ford", "Mazda")
println(cars.size)
// Outputs 4
Check if an Element Exists
You can use the in operator to check if an element exists in an array:
Example
val cars = arrayOf("Volvo", "BMW", "Ford", "Mazda")
if ("Volvo" in cars) {
println("It exists!")
} else {
println("It does not exist.")
}
Loop Through an Array
Often when you work with arrays, you need to loop through all of the elements.
You can loop through the array elements with the for loop, which you will learn even more about in the next chapter.
The following example outputs all elements in the cars array:
Example
val cars = arrayOf("Volvo", "BMW", "Ford", "Mazda")
for (x in cars) {
println(x)
}

Kotlin For Loop
Kotlin For Loop
Often when you work with arrays, you need to loop through all of the elements.
To loop through array elements, use the for loop together with the in operator:
Example
Output all elements in the cars array:
val cars = arrayOf("Volvo", "BMW", "Ford", "Mazda")
for (x in cars) {
println(x)
}
You can loop through all kinds of arrays. In the example above, we used an array of strings.
In the example below, we loop through an array of integers:
Example
val nums = arrayOf(1, 5, 10, 15, 20)
for (x in nums) {
println(x)
}
Traditional For Loop
Unlike Java and other programming languages, there is no traditional for loop in Kotlin.
In Kotlin, the for loop is used to loop through arrays, ranges, and other things that contains a countable number of values.
You will learn more about ranges in the next chapter - which will create a range of values.
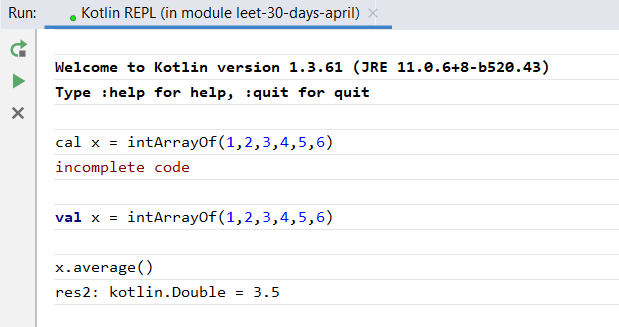
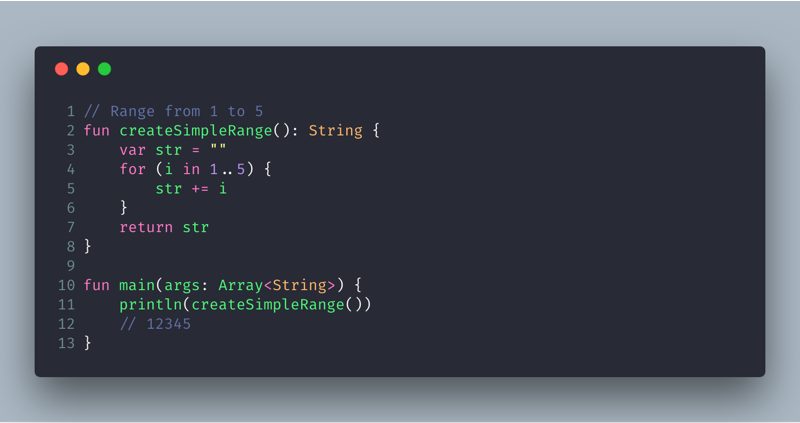
Kotlin Ranges
Kotlin Ranges
With the , you can also create ranges of values with "..":
Example
Print the whole alphabet:
for (chars in 'a'..'x') {
println(chars)
}
You can also create ranges of numbers:
Example
for (nums in 5..15) {
println(nums)
}
Note: The first and last value is included in the range.
Check if a Value Exists
You can also use the in operator to check if a value exists in a range:
Example
val nums = arrayOf(2, 4, 6, 8)
if (2 in nums) {
println("It exists!")
} else {
println("It does not exist.")
}
Example
val cars = arrayOf("Volvo", "BMW", "Ford", "Mazda")
if ("Volvo" in cars) {
println("It exists!")
} else {
println("It does not exist.")
}
Break or Continue a Range
You can also use the break and continue keywords in a range/for loop:
Example
Stop the loop when nums is equal to 10:
for (nums in 5..15) {
if (nums == 10) {
break
}
println(nums)
}
Example
Skip the value of 10 in the loop, and continue with the next iteration:
for (nums in 5..15) {
if (nums == 10) {
continue
}
println(nums)
}
Kotlin Functions
A function is a block of code which only runs when it is called.
You can pass data, known as parameters, into a function.
Functions are used to perform certain actions, and they are also known as methods.
Predefined Functions
So it turns out you already know what a function is. You have been using it the whole time through this tutorial!
For example, println() is a function. It is used to output/print text to the screen:
Example
fun main() {
  println("Hello World")
}
Create Your Own Functions
To create your own function, use the fun keyword, and write the name of the function, followed by parantheses ():
Example
Create a function named "myFunction" that should output some text:
fun myFunction() {
println("I just got executed!")
}
Call a Function
Now that you have created a function, you can execute it by calling it.
To call a function in Kotlin, write the name of the function followed by two parantheses ().
In the following example, myFunction() will print some text (the action), when it is called:
Example
fun main() {
myFunction() // Call myFunction
}
// Outputs "I just got executed!"
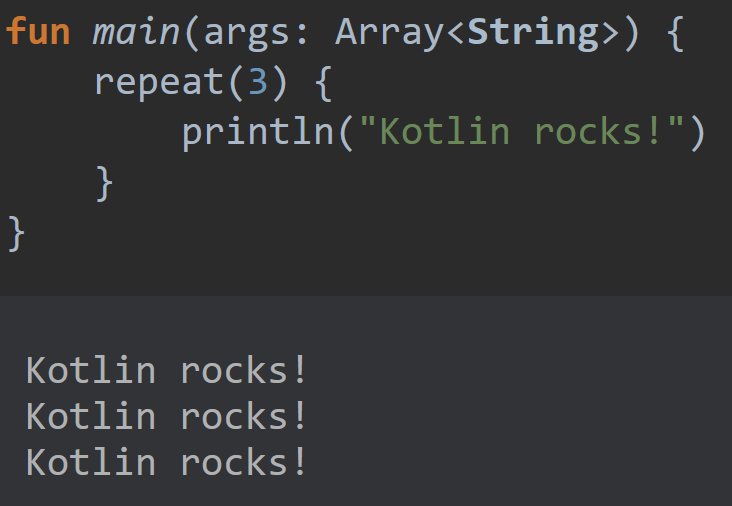
A function can be called multiple times, if you want:
Example
fun main() {
myFunction()
myFunction()
myFunction()
}
// I just got executed!
// I just got executed!
// I just got executed!
Function Parameters
Information can be passed to functions as parameter.
Parameters are specified after the function name, inside the parentheses. You can add as many parameters as you want, just separate them with a comma. Just note that you must specify the type of each parameter (Int, String, etc).
The following example has a function that takes a String called fname as parameter. When the function is called, we pass along a first name, which is used inside the function to print the full name:
Example
fun myFunction(fname: String) {
println(fname + " Doe")
}
fun main() {
myFunction("John")
myFunction("Jane")
myFunction("George")
}
// John Doe
// Jane Doe
// George Doe
When a parameter is passed to the function, it is called an argument. So, from the example above: fname is a parameter, while
John, Jane and
George are arguments.
Multiple Parameters
You can have as many parameters as you like:
Example
fun myFunction(fname: String, age: Int) {
println(fname + " is " + age)
}
fun main() {
myFunction("John", 35)
myFunction("Jane", 32)
myFunction("George", 15)
}
// John is 35
// Jane is 32
// George is 15
Note: When working with multiple parameters, the function call must have the same number of arguments as there are parameters, and the arguments must be passed in the same order.
Return Values
In the examples above, we used functions to output a value. In the following example, we will use a function to return a value and assign it to a variable.
To return a value, use the return keyword, and specify the return type after the function's parantheses (Int in this example):
Example
A function with one Int parameter, and Int return type:
fun myFunction(x: Int): Int {
return (x + 5)
}
fun main() {
var result = myFunction(3)
println(result)
}
// 8 (3 + 5)
Using two parameters:
Example
A function with two Int parameters, and Int return type:
fun myFunction(x: Int, y: Int): Int {
return (x + y)
}
fun main() {
var result = myFunction(3, 5)
println(result)
}
// 8 (3 + 5)
Shorter Syntax for Return Values
There is also a shorter syntax for returning values. You can use the = operator instead of return without specifying the return type. Kotlin is smart enough to automatically find out what it is:
Example
fun myFunction(x: Int, y: Int) = x + y
fun main() {
var result = myFunction(3, 5)
println(result)
}
// 8 (3 + 5)
.jpg)
Kotlin - What is OOP?
OOP stands for Object-Oriented Programming.
Procedural programming is about writing procedures or methods that perform operations on the data, while object-oriented programming is about creating objects that contain both data and methods.
Object-oriented programming has several advantages over procedural programming:
- OOP is faster and easier to execute
- OOP provides a clear structure for the programs
- OOP helps to keep the Kotlin code DRY "Don't Repeat Yourself", and makes the code easier to maintain, modify and debug
- OOP makes it possible to create full reusable applications with less code and shorter development time
Tip: The "Don't Repeat Yourself" (DRY) principle is about reducing the repetition of code. You should extract out the codes that are common for the application, and place them at a single place and reuse them instead of repeating it.
Kotlin - What are Classes and Objects?
Classes and objects are the two main aspects of object-oriented programming.
Look at the following illustration to see the difference between class and objects:
class
Fruit
objects
Apple
Banana
Mango
Another example:
class
Car
objects
Volvo
Audi
Toyota
So, a class is a template for objects, and an object is an instance of a class.
When the individual objects are created, they inherit all the variables and methods from the class.
You will learn much more about classes and objects in the next chapter.

Kotlin Classes/Objects
Everything in Kotlin is associated with classes and objects, along with its properties and functions. For example: in real life, a car is an object. The car has properties, such as brand, weight and color, and functions, such as drive and brake.
A Class is like an object constructor, or a "blueprint" for creating objects.
Create a Class
To create a class, use the class keyword, and specify the name of the class:
Example
Create a Car class along with some properties (brand, model and year)
class Car {
var brand = ""
var model = ""
var year = 0
}
A property is basically a variable that belongs to the class.
Good to Know: It is considered good practice to start the name of a class with an upper case letter, for better organization.
Create an Object
Now we can use the class named Car to create objects.
In the example below, we create an object of Car called c1, and then we access the properties of c1 by using the dot syntax (.), just like we did to access array and string properties:
Example
// Create a c1 object of the Car class
val c1 = Car()
// Access the properties and add some values to it
c1.brand = "Ford"
c1.model = "Mustang"
c1.year = 1969
println(c1.brand) // Outputs Ford
println(c1.model) // Outputs Mustang
println(c1.year) // Outputs 1969
Multiple Objects
You can create multiple objects of one class:
Example
val c1 = Car()
c1.brand = "Ford"
c1.model = "Mustang"
c1.year = 1969
val c2 = Car()
c2.brand = "BMW"
c2.model = "X5"
c2.year = 1999
println(c1.brand) // Ford
println(c2.brand) // BMW

Kotlin Constructors
Kotlin Constructor
In the previous chapter, we created an object of a class, and specified the properties inside the class, like this:
Example
class Car {
var brand = ""
var model = ""
var year = 0
}
fun main() {
val c1 = Car()
c1.brand = "Ford"
c1.model = "Mustang"
c1.year = 1969
}
In Kotlin, there's a faster way of doing this, by using a constructor.
A constructor is like a special , and it is defined by using two parantheses () after the class name. You can specify the properties inside of the parantheses (like passing parameters into a regular function).
The constructor will initialize the properties when you create an object of a class. Just remember to specify the type of the property/variable:
Example
class Car(var brand: String, var model: String, var year: Int)
fun main() {
val c1 = Car("Ford", "Mustang", 1969)
}
Now it's even easier to specify multiple objects of one class:
Example
class Car(var brand: String, var model: String, var year: Int)
fun main() {
val c1 = Car("Ford", "Mustang", 1969)
val c2 = Car("BMW", "X5", 1999)
val c3 = Car("Tesla", "Model S", 2020)
}
Kotlin Class Functions
Kotlin Class Functions
You can also use inside a class, to perfom certain actions:
Example
Create a drive() function inside the Car class and call it:
class Car(var brand: String, var model: String, var year: Int) {
// Class function
fun drive() {
println("Wrooom!")
}
}
fun main() {
val c1 = Car("Ford", "Mustang", 1969)
// Call the function
c1.drive()
}
Tip: When a function is declared inside a class, it is known as a class function, or member function.
Note: When an object of the class is created, it has access to all of the class functions.
Class Function Parameters
Just like with regular functions, you can pass parameters to a class function:
Example
Create two functions: drive() and speed(), and pass parameters to the speed() function:
class Car(var brand: String, var model: String, var year: Int) {
// Class function
fun drive() {
println("Wrooom!")
}
// Class function with parameters
fun speed(maxSpeed: Int) {
println("Max speed is: " + maxSpeed)
}
}
fun main() {
val c1 = Car("Ford", "Mustang", 1969)
// Call the functions
c1.drive()
c1.speed(200)
}
Kotlin Inheritance
Kotlin Inheritance (Subclass and Superclass)
In Kotlin, it is possible to inherit class properties and functions from one class to another. We group the "inheritance concept" into two categories:
- subclass (child) - the class that inherits from another class
- superclass (parent) - the class being inherited from
In the example below, MyChildClass (subclass) inherits the properties from the
MyParentClass class (superclass):
Example
// Superclass
open class MyParentClass {
val x = 5
}
// Subclass
class MyChildClass: MyParentClass() {
fun myFunction() {
println(x) // x is now inherited from the superclass
}
}
// Create an object of MyChildClass and call myFunction
fun main() {
val myObj = MyChildClass()
myObj.myFunction()
}
Example Explained
Use the open keyword in front of the superclass/parent, to make this the class other classes should inherit properties and functions from.
To inherit from a class, specify the name of the subclass, followed by a colon :, and then the name of the superclass.
Why And When To Use "Inheritance"?
- It is useful for code reusability: reuse properties and functions of an existing class when you create a new class.
.jpg)
Kotlin Examples
Kotlin Syntax and Output
Kotlin Comments
Kotlin Variables
Kotlin Data Types
Kotlin Operators
Kotlin Strings
Kotlin Booleans
Kotlin If...Else
Kotlin When
Kotlin While Loop
Kotlin While Loop
Kotlin Arrays
Kotlin For Loops
Kotlin Ranges
Kotlin Functions
Kotlin Classes
Kotlin Exercises
You can test your Kotlin skills with W3Schools' Exercises.
Exercises
We have gathered a variety of Kotlin exercises (with answers) for each Kotlin Chapter.
Try to solve an exercise by editing some code, or show the answer to see what you've done wrong.
Count Your Score
You will get 1 point for each correct answer. Your score and total score will always be displayed.
Start Kotlin Exercises
Good luck!
If you don't know Kotlin, we suggest that you read our from scratch.
.jpg)
Kotlin Quiz
You can test your Kotlin skills with W3Schools' Quiz.
The Test
The test contains 25 questions and there is no time limit.
The test is not official, it's just a nice way to see how much you know, or don't know, about Kotlin.
Count Your Score
You will get 1 point for each correct answer. At the end of the Quiz, your total score will be displayed. Maximum score is 25 points.
Start the Quiz
Good luck!
If you do not know Kotlin, we suggest that you read our from scratch.
.jpg)
Kotlin Compiler
Kotlin Compiler (Editor)
With our online Kotlin compiler, you can edit Kotlin code, and view the result in your browser.
Example
fun main() {
  println("Hello World")
}
Hello World
Click on the "Try it Yourself" button to see how it works.
Kotlin Compiler Explained
The window to the left is editable - edit the code and click on the "Run" button to view the result in the right window.
The icons are explained in the table below:
| Icon |
Description |
| |
Go to www.w3schools.com |
| |
Menu button for more options |
| |
Change orientation (horizontally or vertically) |
| |
Change color theme (dark or light) |
If you don't know Kotlin, we suggest that you read our from scratch.
Login