C++ Multi-Dimensional Arrays
Multi-Dimensional Arrays
A multi-dimensional array is an array of arrays.
To declare a multi-dimensional array, define the variable type, specify the name of the array followed by square brackets which specify how many elements the main array has, followed by another set of square brackets which indicates how many elements the sub-arrays have:
As with ordinary arrays, you can insert values with an array literal - a comma-separated list inside curly braces. In a multi-dimensional array, each element in an array literal is another array literal.
string letters[2][4] = {
{ "A", "B", "C", "D" },
{ "E", "F", "G", "H" }
};
Each set of square brackets in an array declaration adds another dimension to an array. An array like the one above is said to have two dimensions.
Arrays can have any number of dimensions. The more dimensions an array has, the more complex the code becomes. The following array has three dimensions:
string letters[2][2][2] = {
{
{ "A", "B" },
{ "C", "D" }
},
{
{ "E", "F" },
{ "G", "H" }
}
};
Access the Elements of a Multi-Dimensional Array
To access an element of a multi-dimensional array, specify an index number in each of the array's dimensions.
This statement accesses the value of the element in the first row (0) and third column (2) of the letters array.
Example
string letters[2][4] = {
{ "A", "B", "C", "D" },
{ "E", "F", "G", "H" }
};
cout << letters[0][2]; // Outputs "C"
Remember that: Array indexes start with 0: [0] is the first element. [1] is the second element, etc.
Change Elements in a Multi-Dimensional Array
To change the value of an element, refer to the index number of the element in each of the dimensions:
Example
string letters[2][4] = {
{ "A", "B", "C", "D" },
{ "E", "F", "G", "H" }
};
letters[0][0] = "Z";
cout << letters[0][0]; // Now outputs "Z" instead of "A"
Loop Through a Multi-Dimensional Array
To loop through a multi-dimensional array, you need one loop for each of the array's dimensions.
The following example outputs all elements in the letters array:
Example
string letters[2][4] = {
{ "A", "B", "C", "D" },
{ "E", "F", "G", "H" }
};
for (int i = 0; i < 2; i++) {
for (int j = 0; j < 4; j++) {
cout << letters[i][j] << "n";
}
}
This example shows how to loop through a three-dimensional array:
Example
string letters[2][2][2] = {
{
{ "A", "B" },
{ "C", "D" }
},
{
{ "E", "F" },
{ "G", "H" }
}
};
for (int i = 0; i < 2; i++) {
for (int j = 0; j < 2; j++) {
for (int k = 0; k < 2; k++) {
cout << letters[i][j][k] << "n";
}
}
}
Why Multi-Dimensional Arrays?
Multi-dimensional arrays are great at representing grids. This example shows a practical use for them. In the following example we use a multi-dimensional array to represent a small game of Battleship:
Example
// We put "1" to indicate there is a ship.
bool ships[4][4] = {
{ 0, 1, 1, 0 },
{ 0, 0, 0, 0 },
{ 0, 0, 1, 0 },
{ 0, 0, 1, 0 }
};
// Keep track of how many hits the player has and how many turns they have played in these variables
int hits = 0;
int numberOfTurns = 0;
// Allow the player to keep going until they have hit all four ships
while (hits < 4) {
int row, column;
cout << "Selecting coordinatesn";
// Ask the player for a row
cout << "Choose a row number between 0 and 3: ";
cin >> row;
// Ask the player for a column
cout << "Choose a column number between 0 and 3: ";
cin >> column;
// Check if a ship exists in those coordinates
if (ships[row][column]) {
// If the player hit a ship, remove it by setting the value to zero.
ships[row][column] = 0;
// Increase the hit counter
hits++;
// Tell the player that they have hit a ship and how many ships are left
cout << "Hit! " << (4-hits) << " left.nn";
} else {
// Tell the player that they missed
cout << "Missnn";
}
// Count how many turns the player has taken
numberOfTurns++;
}
cout << "Victory!n";
cout << "You won in " << numberOfTurns << " turns";
C++ Structures (struct)
C++ Structures
Structures (also called structs) are a way to group several related variables into one place. Each variable in the structure is known as a member of the structure.
Unlike an , a structure can contain many different data types (int, string, bool, etc.).
Create a Structure
To create a structure, use the struct keyword and declare each of its members inside curly braces.
After the declaration, specify the name of the structure variable (myStructure in the example below):
struct { // Structure declaration
int myNum; // Member (int variable)
string myString; // Member (string variable)
} myStructure; // Structure variable
Access Structure Members
To access members of a structure, use the dot syntax (.):
Example
Assign data to members of a structure and print it:
// Create a structure variable called myStructure
struct {
int myNum;
string myString;
} myStructure;
// Assign values to members of myStructure
myStructure.myNum = 1;
myStructure.myString = "Hello World!";
// Print members of myStructure
cout << myStructure.myNum << "n";
cout << myStructure.myString << "n";
One Structure in Multiple Variables
You can use a comma (,) to use one structure in many variables:
struct {
int myNum;
string myString;
} myStruct1, myStruct2, myStruct3; // Multiple structure variables separated with commas
This example shows how to use a structure in two different variables:
Example
Use one structure to represent two cars:
struct {
string brand;
string model;
int year;
} myCar1, myCar2; // We can add variables by separating them with a comma here
// Put data into the first structure
myCar1.brand = "BMW";
myCar1.model = "X5";
myCar1.year = 1999;
// Put data into the second structure
myCar2.brand = "Ford";
myCar2.model = "Mustang";
myCar2.year = 1969;
// Print the structure members
cout << myCar1.brand << " " << myCar1.model << " " << myCar1.year << "n";
cout << myCar2.brand << " " << myCar2.model << " " << myCar2.year << "n";
Named Structures
By giving a name to the structure, you can treat it as a data type. This means that you can create variables with this structure anywhere in the program at any time.
To create a named structure, put the name of the structure right after the struct keyword:
struct myDataType { // This structure is named "myDataType"
int myNum;
string myString;
};
To declare a variable that uses the structure, use the name of the structure as the data type of the variable:
Example
Use one structure to represent two cars:
// Declare a structure named "car"
struct car {
string brand;
string model;
int year;
};
int main() {
// Create a car structure and store it in myCar1;
car myCar1;
myCar1.brand = "BMW";
myCar1.model = "X5";
myCar1.year = 1999;
// Create another car structure and store it in myCar2;
car myCar2;
myCar2.brand = "Ford";
myCar2.model = "Mustang";
myCar2.year = 1969;
// Print the structure members
cout << myCar1.brand << " " << myCar1.model << " " << myCar1.year << "n";
cout << myCar2.brand << " " << myCar2.model << " " << myCar2.year << "n";
return 0;
}
C++ References
Creating References
A reference variable is a "reference" to an existing variable, and it is created with the & operator:
string food = "Pizza"; // food variable
string &meal = food; // reference to food
Now, we can use either the variable name food or the reference name meal to refer to the food variable:
Example
string food = "Pizza";
string &meal = food;
cout << food << "n"; // Outputs Pizza
cout << meal << "n"; // Outputs Pizza
C++ Memory Address
Memory Address
In the example from the previous page, the & operator was used to create a reference variable. But it can also be used to get the memory address of a variable; which is the location of where the variable is stored on the computer.
When a variable is created in C++, a memory address is assigned to the variable. And when we assign a value to the variable, it is stored in this memory address.
To access it, use the & operator, and the result will represent where the variable is stored:
Example
string food = "Pizza";
cout << &food; // Outputs 0x6dfed4
Note: The memory address is in hexadecimal form (0x..). Note that you may not get the same result in your program.
And why is it useful to know the memory address?
References and Pointers (which you will learn about in the next chapter) are important in C++, because they give you the ability to manipulate the data in the computer's memory - which can reduce the code and improve the performance.
These two features are one of the things that make C++ stand out from other programming languages, like and .
C++ Pointers
Creating Pointers
You learned from the previous chapter, that we can get the memory
address of a variable by using the &
operator:
Example
string food = "Pizza";
// A food variable of type string
cout <<
food; // Outputs the value of food (Pizza)
cout << &food; // Outputs the memory address of food (0x6dfed4)
A pointer however, is a variable that stores the memory address as its value.
A pointer variable points to a data type (like int or string) of the same
type, and is created with the * operator. The address of the variable you're working with is assigned to the pointer:
Example
string food = "Pizza"; // A food variable
of type string
string* ptr =
&food;   // A pointer variable, with the name
ptr, that stores the
address of food
// Output the value of food (Pizza)
cout << food << "n";
// Output
the memory address of food (0x6dfed4)
cout << &food << "n";
//
Output the memory address of food with the pointer (0x6dfed4)
cout <<
ptr << "n";
Example explained
Create a pointer variable with the name ptr, that points to a string variable, by using the
asterisk sign
* (string* ptr).
Note that the type of the pointer has to match the type of the variable you're
working with.
Use the & operator to store the memory address of the
variable called food, and assign it to the pointer.
Now, ptr holds the value of food's memory address.
Tip: There are three ways to declare pointer variables, but the first way is preferred:
string* mystring; // Preferred
string *mystring;
string * mystring;
C++ Pointers
Creating Pointers
You learned from the previous chapter, that we can get the memory address of a variable by using the & operator:
Example
string food = "Pizza"; // A food variable of type string
cout << food; // Outputs the value of food (Pizza)
cout << &food; // Outputs the memory address of food (0x6dfed4)
A pointer however, is a variable that stores the memory address as its value.
A pointer variable points to a data type (like int or string) of the same type, and is created with the * operator. The address of the variable you're working with is assigned to the pointer:
Example
string food = "Pizza"; // A food variable of type string
string* ptr = &food; // A pointer variable, with the name ptr, that stores the address of food
// Output the value of food (Pizza)
cout << food << "n";
// Output the memory address of food (0x6dfed4)
cout << &food << "n";
// Output the memory address of food with the pointer (0x6dfed4)
cout << ptr << "n";
Example explained
Create a pointer variable with the name ptr, that points to a string variable, by using the asterisk sign * (string* ptr). Note that the type of the pointer has to match the type of the variable you're working with.
Use the & operator to store the memory address of the variable called food, and assign it to the pointer.
Now, ptr holds the value of food's memory address.
Tip: There are three ways to declare pointer variables, but the first way is preferred:
string* mystring; // Preferred
string *mystring;
string * mystring;
C++ Dereference
Get Memory Address and Value
In the example from the previous page, we used the pointer variable to get the memory address of a variable (used together with the & reference operator). However, you can also use the pointer to get the value of the variable, by using the * operator (the dereference operator):
Example
string food = "Pizza"; // Variable declaration
string* ptr = &food; // Pointer declaration
// Reference: Output the memory address of food with the pointer (0x6dfed4)
cout << ptr << "n";
// Dereference: Output the value of food with the pointer (Pizza)
cout << *ptr << "n";
Note that the * sign can be confusing here, as it does two different things in our code:
- When used in declaration (string* ptr), it creates a pointer variable.
- When not used in declaration, it act as a dereference operator.

C++ Modify Pointers
Modify the Pointer Value
You can also change the pointer's value. But note that this will also change the value of the original variable:
Example
string food = "Pizza";
string* ptr = &food;
// Output the value of food (Pizza)
cout << food << "n";
// Output the memory address of food (0x6dfed4)
cout << &food << "n";
// Access the memory address of food and output its value (Pizza)
cout << *ptr << "n";
// Change the value of the pointer
*ptr = "Hamburger";
// Output the new value of the pointer (Hamburger)
cout << *ptr << "n";
// Output the new value of the food variable (Hamburger)
cout << food << "n";
.png)
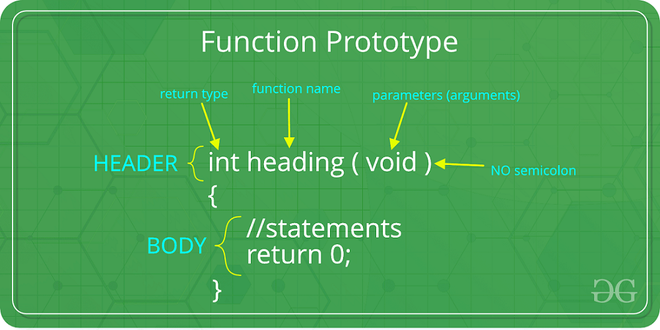
C++ Functions
A function is a block of code which only runs when it is called.
You can pass data, known as parameters, into a function.
Functions are used to perform certain actions, and they are important for reusing code: Define the code once, and use it many times.
Create a Function
C++ provides some pre-defined functions, such as main(), which is used to execute code. But you can also create your own functions to perform certain actions.
To create (often referred to as declare) a function, specify the name of the function, followed by parentheses ():
Syntax
void myFunction() {
// code to be executed
}
Example Explained
myFunction() is the name of the functionvoid means that the function does not have a return value. You will learn more about return values later in the next chapter- inside the function (the body), add code that defines what the function should do
Call a Function
Declared functions are not executed immediately. They are "saved for later use", and will be executed later, when they are called.
To call a function, write the function's name followed by two parentheses () and a semicolon ;
In the following example, myFunction() is used to print a text (the action), when it is called:
Example
Inside main, call
myFunction():
// Create a function
void myFunction() {
cout << "I just got executed!";
}
int main() {
myFunction(); // call the function
return 0;
}
// Outputs "I just got executed!"
A function can be called multiple times:
Example
void myFunction() {
cout << "I just got executed!n";
}
int main() {
myFunction();
myFunction();
myFunction();
return 0;
}
// I just got executed!
// I just got executed!
// I just got executed!
Function Declaration and Definition
A C++ function consist of two parts:
- Declaration: the return type, the name of the function, and parameters (if any)
- Definition: the body of the function (code to be executed)
void myFunction() { // declaration
// the body of the function (definition)
}
Note: If a user-defined function, such as myFunction() is declared after the main() function, an error will occur:
Example
int main() {
myFunction();
return 0;
}
void myFunction() {
cout << "I just got executed!";
}
// Error
However, it is possible to separate the declaration and the definition of the function - for code optimization.
You will often see C++ programs that have function declaration above main(), and function definition below main(). This will make the code better organized and easier to read:
Example
// Function declaration
void myFunction();
// The main method
int main() {
myFunction(); // call the function
return 0;
}
// Function definition
void myFunction() {
cout << "I just got executed!";
}

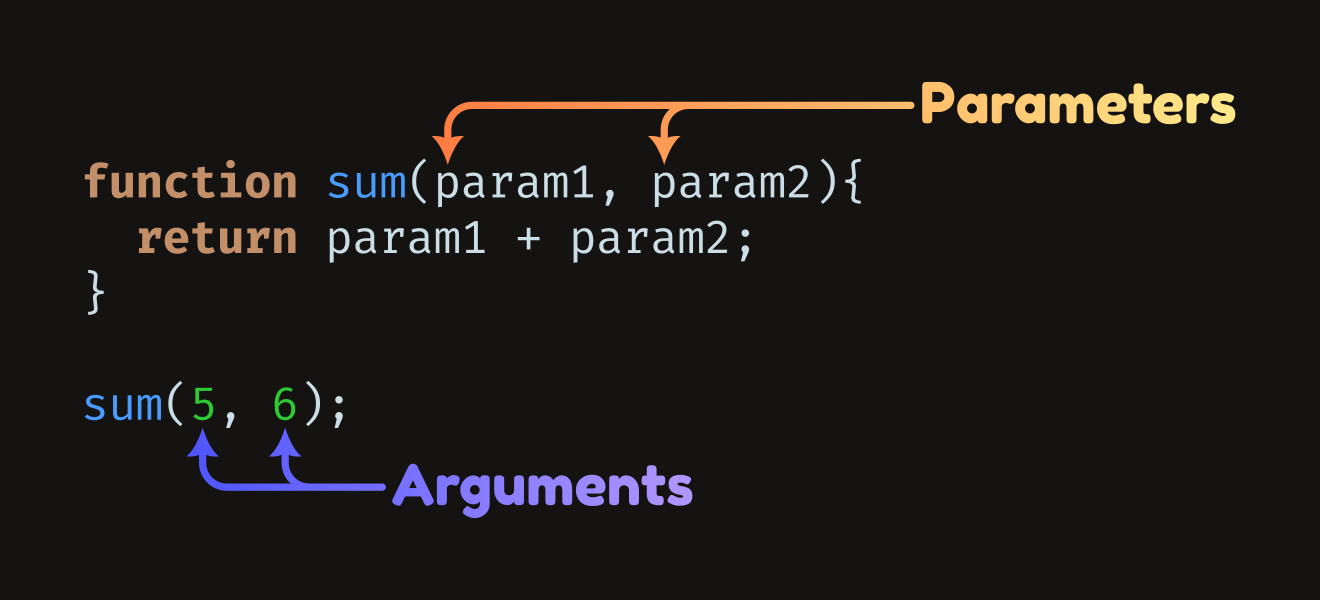
C++ Function Parameters
Parameters and Arguments
Information can be passed to functions as a parameter. Parameters act as variables inside the function.
Parameters are specified after the function name, inside the parentheses. You can add as many parameters as you want, just separate them with a comma:
Syntax
void functionName(parameter1, parameter2, parameter3) {
// code to be executed
}
The following example has a function that takes a string called fname as parameter. When the function is called, we pass along a first name, which is used inside the function to print the full name:
Example
void myFunction(string fname) {
cout << fname << " Refsnesn";
}
int main() {
myFunction("Liam");
myFunction("Jenny");
myFunction("Anja");
return 0;
}
// Liam Refsnes
// Jenny Refsnes
// Anja Refsnes
When a parameter is passed to the function, it is called an argument. So, from the example above: fname is a parameter, while Liam, Jenny and Anja are arguments.
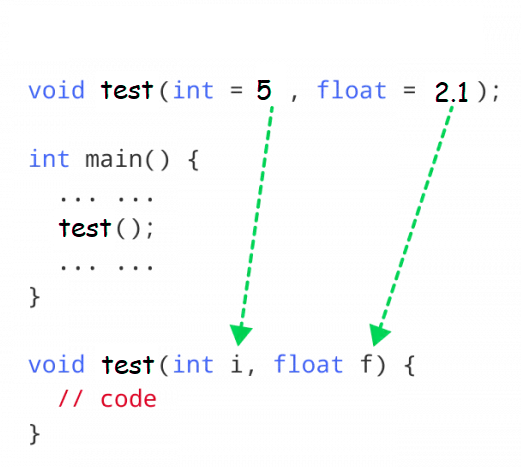
C++ Default Parameters
Default Parameter Value
You can also use a default parameter value, by using the equals sign (=).
If we call the function without an argument, it uses the default value ("Norway"):
Example
void myFunction(string country = "Norway") {
cout << country << "n";
}
int main() {
myFunction("Sweden");
myFunction("India");
myFunction();
myFunction("USA");
return 0;
}
// Sweden
// India
// Norway
// USA
A parameter with a default value, is often known as an "optional parameter". From the example above, country is an optional parameter and "Norway" is the default value.
C++ Multiple Parameters
Multiple Parameters
Inside the function, you can add as many parameters as you want:
Example
void myFunction(string fname, int age) {
cout << fname << " Refsnes. " << age << " years old. n";
}
int main() {
myFunction("Liam", 3);
myFunction("Jenny", 14);
myFunction("Anja", 30);
return 0;
}
// Liam Refsnes. 3 years old.
// Jenny Refsnes. 14 years old.
// Anja Refsnes. 30 years old.
Note that when you are working with multiple parameters, the function call must have the same number of arguments as there are parameters, and the arguments must be passed in the same order.
C++ The Return Keyword
Return Values
The void keyword, used in the previous examples, indicates that the function should not return a value. If you want the function to return a value, you can use a data type (such as int, string, etc.) instead of void, and use the return keyword inside the function:
Example
int myFunction(int x) {
return 5 + x;
}
int main() {
cout << myFunction(3);
return 0;
}
// Outputs 8 (5 + 3)
This example returns the sum of a function with two parameters:
Example
int myFunction(int x, int y) {
return x + y;
}
int main() {
cout << myFunction(5, 3);
return 0;
}
// Outputs 8 (5 + 3)
You can also store the result in a variable:
Example
int myFunction(int x, int y) {
return x + y;
}
int main() {
int z = myFunction(5, 3);
cout << z;
return 0;
}
// Outputs 8 (5 + 3)
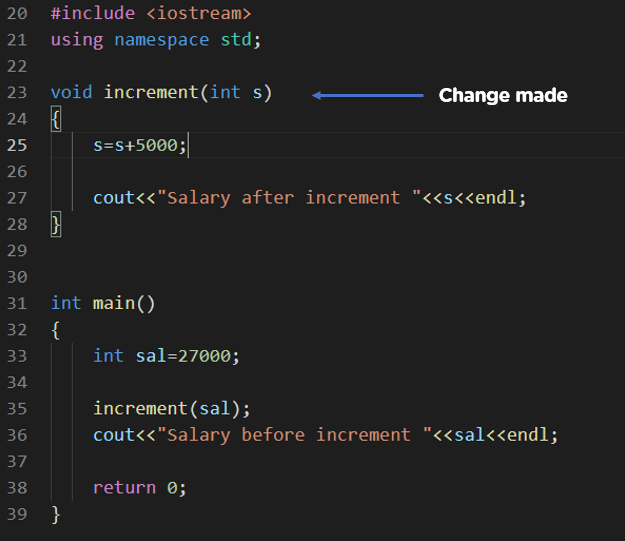
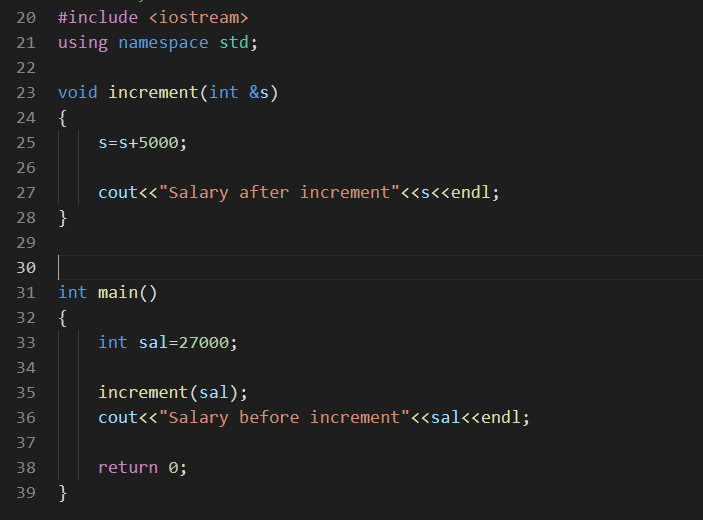
C++ Functions - Pass By Reference
Pass By Reference
In the examples from the previous page, we used normal variables when we passed parameters to a function. You can also pass a to the function. This can be useful when you need to change the value of the arguments:
Example
void swapNums(int &x, int &y) {
int z = x;
x = y;
y = z;
}
int main() {
int firstNum = 10;
int secondNum = 20;
cout << "Before swap: " << "n";
cout << firstNum << secondNum << "n";
// Call the function, which will change the values of firstNum and secondNum
swapNums(firstNum, secondNum);
cout << "After swap: " << "n";
cout << firstNum << secondNum << "n";
return 0;
}
C++ Pass Array to a Function
Pass Arrays as Function Parameters
You can also pass to a function:
Example
void myFunction(int myNumbers[5]) {
for (int i = 0; i < 5; i++) {
cout << myNumbers[i] << "n";
}
}
int main() {
int myNumbers[5] = {10, 20, 30, 40, 50};
myFunction(myNumbers);
return 0;
}
Example Explained
The function (myFunction) takes an array as its parameter (int myNumbers[5]), and loops through the array elements with the for loop.
When the function is called inside main(), we pass along the myNumbers array, which outputs the array elements.
Note that when you call the function, you only need to use the name of the array when passing it as an argument myFunction(myNumbers). However, the full declaration of the array is needed in the function parameter (int myNumbers[5]).
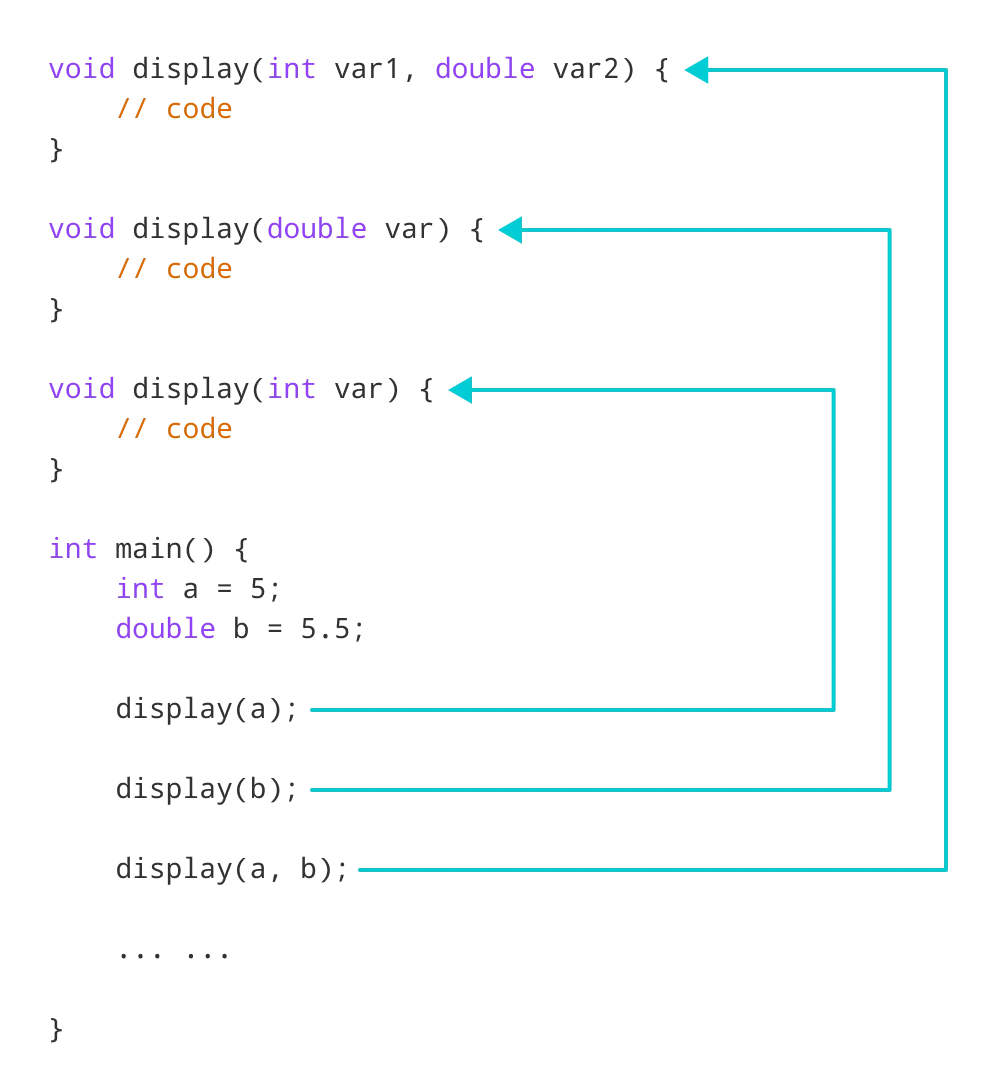
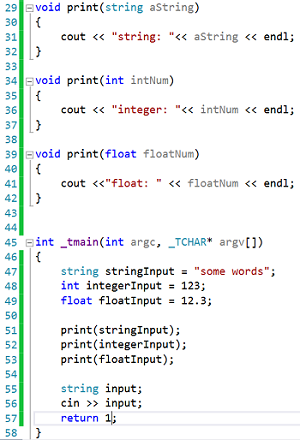
C++ Function Overloading
Function Overloading
With function overloading, multiple functions can have the same name with different parameters:
Example
int myFunction(int x)
float myFunction(float x)
double myFunction(double x, double y)
Consider the following example, which have two functions that add numbers of different type:
Example
int plusFuncInt(int x, int y) {
return x + y;
}
double plusFuncDouble(double x, double y) {
return x + y;
}
int main() {
int myNum1 = plusFuncInt(8, 5);
double myNum2 = plusFuncDouble(4.3, 6.26);
cout << "Int: " << myNum1 << "n";
cout << "Double: " << myNum2;
return 0;
}
Instead of defining two functions that should do the same thing, it is better to overload one.
In the example below, we overload the plusFunc function to work for both int and double:
Example
int plusFunc(int x, int y) {
return x + y;
}
double plusFunc(double x, double y) {
return x + y;
}
int main() {
int myNum1 = plusFunc(8, 5);
double myNum2 = plusFunc(4.3, 6.26);
cout << "Int: " << myNum1 << "n";
cout << "Double: " << myNum2;
return 0;
}
Note: Multiple functions can have the same name as long as the number and/or type of parameters are different.
C++ Recursion
Recursion
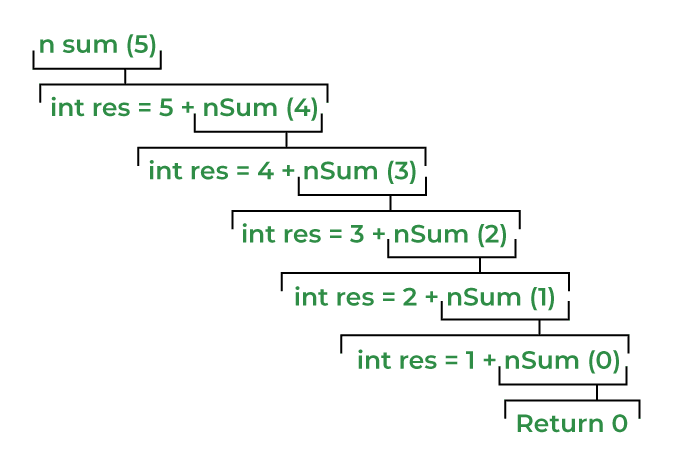
Recursion is the technique of making a function call itself. This technique provides a way to break complicated problems down into simple problems which are easier to solve.
Recursion may be a bit difficult to understand. The best way to figure out how it works is to experiment with it.
Recursion Example
Adding two numbers together is easy to do, but adding a range of numbers is more complicated. In the following example, recursion is used to add a range of numbers together by breaking it down into the simple task of adding two numbers:
Example
int sum(int k) {
if (k > 0) {
return k + sum(k - 1);
} else {
return 0;
}
}
int main() {
int result = sum(10);
cout << result;
return 0;
}
Example Explained
When the sum() function is called, it adds parameter k to the sum of all numbers smaller than k and returns the result. When k becomes 0, the function just returns 0. When running, the program follows these steps:
10 + sum(9)
10 + ( 9 + sum(8) )
10 + ( 9 + ( 8 + sum(7) ) )
...
10 + 9 + 8 + 7 + 6 + 5 + 4 + 3 + 2 + 1 + sum(0)
10 + 9 + 8 + 7 + 6 + 5 + 4 + 3 + 2 + 1 + 0
Since the function does not call itself when k is 0, the program stops there and returns the result.
The developer should be very careful with recursion as it can be quite easy to slip into writing a function which never terminates, or one that uses excess amounts of memory or processor power. However, when written correctly recursion can be a very efficient and mathematically-elegant approach to programming.
C++ OOP
C++ What is OOP?
OOP stands for Object-Oriented Programming.
Procedural programming is about writing procedures or functions that perform operations on the data, while object-oriented programming is about creating objects that contain both data and functions.
Object-oriented programming has several advantages over procedural programming:
- OOP is faster and easier to execute
- OOP provides a clear structure for the programs
- OOP helps to keep the C++ code DRY "Don't Repeat Yourself", and makes the code easier to maintain, modify and debug
- OOP makes it possible to create full reusable applications with less code and shorter development time
Tip: The "Don't Repeat Yourself" (DRY) principle is about reducing the repetition of code. You should extract out the codes that are common for the application, and place them at a single place and reuse them instead of repeating it.
C++ What are Classes and Objects?
Classes and objects are the two main aspects of object-oriented programming.
Look at the following illustration to see the difference between class and objects:
objects
Apple
Banana
Mango
Another example:
objects
Volvo
Audi
Toyota
So, a class is a template for objects, and an object is an instance of a class.
When the individual objects are created, they inherit all the variables and functions from the class.
You will learn much more about in the next chapter.
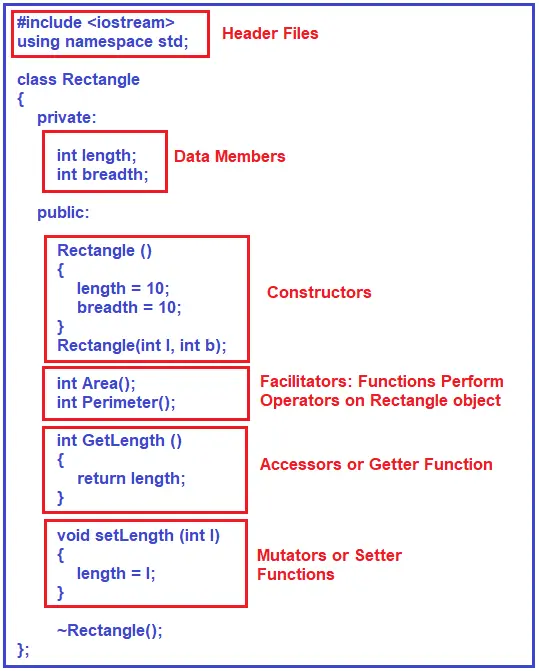
C++ Classes and Objects
C++ Classes/Objects
C++ is an object-oriented programming language.
Everything in C++ is associated with classes and objects, along with its attributes and methods. For example: in real life, a car is an object. The car has attributes, such as weight and color, and methods, such as drive and brake.
Attributes and methods are basically variables and functions that belongs to the class. These are often referred to as "class members".
A class is a user-defined data type that we can use in our program, and it works as an object constructor, or a "blueprint" for creating objects.
Create a Class
To create a class, use the class keyword:
Example
Create a class called "MyClass":
class MyClass { // The class
public: // Access specifier
int myNum; // Attribute (int variable)
string myString; // Attribute (string variable)
};
Example explained
- The
class keyword is used to create a class called MyClass.
- The
public keyword is an access specifier, which specifies that members (attributes and methods) of the class are accessible from outside the class. You will learn more about later.
- Inside the class, there is an integer variable
myNum and a string variable myString. When variables are declared within a class, they are called attributes.
- At last, end the class definition with a semicolon
;.
Create an Object
In C++, an object is created from a class. We have already created the class named MyClass, so now we can use this to create objects.
To create an object of MyClass, specify the class name, followed by the object name.
To access the class attributes (myNum and myString), use the dot syntax (.) on the object:
Example
Create an object called "myObj" and access the attributes:
class MyClass { // The class
public: // Access specifier
int myNum; // Attribute (int variable)
string myString; // Attribute (string variable)
};
int main() {
MyClass myObj; // Create an object of MyClass
// Access attributes and set values
myObj.myNum = 15;
myObj.myString = "Some text";
// Print attribute values
cout << myObj.myNum << "n";
cout << myObj.myString;
return 0;
}
Multiple Objects
You can create multiple objects of one class:
Example
// Create a Car class with some attributes
class Car {
public:
string brand;
string model;
int year;
};
int main() {
// Create an object of Car
Car carObj1;
carObj1.brand = "BMW";
carObj1.model = "X5";
carObj1.year = 1999;
// Create another object of Car
Car carObj2;
carObj2.brand = "Ford";
carObj2.model = "Mustang";
carObj2.year = 1969;
// Print attribute values
cout << carObj1.brand << " " << carObj1.model << " " << carObj1.year << "n";
cout << carObj2.brand << " " << carObj2.model << " " << carObj2.year << "n";
return 0;
}
C++ Class Methods
Class Methods
Methods are functions that belongs to the class.
There are two ways to define functions that belongs to a class:
- Inside class definition
- Outside class definition
In the following example, we define a function inside the class, and we name it "myMethod".
Note: You access methods just like you access attributes; by creating an object of the class and using the dot syntax (.):
Inside Example
class MyClass { // The class
public: // Access specifier
void myMethod() { // Method/function defined inside the class
cout << "Hello World!";
}
};
int main() {
MyClass myObj; // Create an object of MyClass
myObj.myMethod(); // Call the method
return 0;
}
To define a function outside the class definition, you have to declare it inside the class and then define it outside of the class. This is done by specifiying the name of the class, followed the scope resolution :: operator, followed by the name of the function:
Outside Example
class MyClass { // The class
public: // Access specifier
void myMethod(); // Method/function declaration
};
// Method/function definition outside the class
void MyClass::myMethod() {
cout << "Hello World!";
}
int main() {
MyClass myObj; // Create an object of MyClass
myObj.myMethod(); // Call the method
return 0;
}
Parameters
You can also add parameters:
Example
#include
using namespace std;
class Car {
public:
int speed(int maxSpeed);
};
int Car::speed(int maxSpeed) {
return maxSpeed;
}
int main() {
Car myObj; // Create an object of Car
cout << myObj.speed(200); // Call the method with an argument
return 0;
}
C++ Constructors
Constructors
A constructor in C++ is a special method that is automatically called when an object of a class is created.
To create a constructor, use the same name as the class, followed by parentheses ():
Example
class MyClass { // The class
public: // Access specifier
MyClass() { // Constructor
cout << "Hello World!";
}
};
int main() {
MyClass myObj; // Create an object of MyClass (this will call the constructor)
return 0;
}
Note: The constructor has the same name as the class, it is always public, and it does not have any return value.
Constructor Parameters
Constructors can also take parameters (just like regular functions), which can be useful for setting initial values for attributes.
The following class have brand, model and year attributes, and a constructor with different parameters. Inside the constructor we set the attributes equal to the constructor parameters (brand=x, etc). When we call the constructor (by creating an object of the class), we pass parameters to the constructor, which will set the value of the corresponding attributes to the same:
Example
class Car { // The class
public: // Access specifier
string brand; // Attribute
string model; // Attribute
int year; // Attribute
Car(string x, string y, int z) { // Constructor with parameters
brand = x;
model = y;
year = z;
}
};
int main() {
// Create Car objects and call the constructor with different values
Car carObj1("BMW", "X5", 1999);
Car carObj2("Ford", "Mustang", 1969);
// Print values
cout << carObj1.brand << " " << carObj1.model << " " << carObj1.year << "n";
cout << carObj2.brand << " " << carObj2.model << " " << carObj2.year << "n";
return 0;
}
Just like functions, constructors can also be defined outside the class. First, declare the constructor inside the class, and then define it outside of the class by specifying the name of the class, followed by the scope resolution :: operator, followed by the name of the constructor (which is the same as the class):
Example
class Car { // The class
public: // Access specifier
string brand; // Attribute
string model; // Attribute
int year; // Attribute
Car(string x, string y, int z); // Constructor declaration
};
// Constructor definition outside the class
Car::Car(string x, string y, int z) {
brand = x;
model = y;
year = z;
}
int main() {
// Create Car objects and call the constructor with different values
Car carObj1("BMW", "X5", 1999);
Car carObj2("Ford", "Mustang", 1969);
// Print values
cout << carObj1.brand << " " << carObj1.model << " " << carObj1.year << "n";
cout << carObj2.brand << " " << carObj2.model << " " << carObj2.year << "n";
return 0;
}
C++ Access Specifiers
Access Specifiers
By now, you are quite familiar with the public keyword that appears in all of our class examples:
Example
class MyClass { // The class
public: // Access specifier
// class members goes here
};
The public keyword is an access specifier. Access specifiers define how the members (attributes and methods) of a class can be accessed. In the example above, the members are public - which means that they can be accessed and modified from outside the code.
However, what if we want members to be private and hidden from the outside world?
In C++, there are three access specifiers:
public - members are accessible from outside the classprivate - members cannot be accessed (or viewed) from outside the classprotected - members cannot be accessed from outside the class, however, they can be accessed in inherited classes. You will learn more about later.
In the following example, we demonstrate the differences between public and private members:
Example
class MyClass {
public: // Public access specifier
int x; // Public attribute
private: // Private access specifier
int y; // Private attribute
};
int main() {
MyClass myObj;
myObj.x = 25; // Allowed (public)
myObj.y = 50; // Not allowed (private)
return 0;
}
If you try to access a private member, an error occurs:
error: y is private
Note: It is possible to access private members of a class using a public method inside the same class. See the next chapter () on how to do this.
Tip: It is considered good practice to declare your class attributes as private (as often as you can). This will reduce the possibility of yourself (or others) to mess up the code. This is also the main ingredient of the concept, which you will learn more about in the next chapter.
Note: By default, all members of a class are private if you don't specify an access specifier:
Example
class MyClass {
int x; // Private attribute
int y; // Private attribute
};

C++ Encapsulation
Encapsulation
The meaning of Encapsulation, is to make sure that "sensitive" data is hidden from users. To achieve this, you must declare class variables/attributes as private (cannot be accessed from outside the class). If you want others to read or modify the value of a private member, you can provide public get and set methods.
Access Private Members
To access a private attribute, use public "get" and "set" methods:
Example
#include
using namespace std;
class Employee {
private:
// Private attribute
int salary;
public:
// Setter
void setSalary(int s) {
salary = s;
}
// Getter
int getSalary() {
return salary;
}
};
int main() {
Employee myObj;
myObj.setSalary(50000);
cout << myObj.getSalary();
return 0;
}
Example explained
The salary attribute is private, which have restricted access.
The public setSalary() method takes a parameter (s) and assigns it to the salary attribute (salary = s).
The public getSalary() method returns the value of the private salary attribute.
Inside main(), we create an object of the Employee class. Now we can use the setSalary() method to set the value of the private attribute to 50000. Then we call the getSalary() method on the object to return the value.
Why Encapsulation?
- It is considered good practice to declare your class attributes as private (as often as you can). Encapsulation ensures better control of your data, because you (or others) can change one part of the code without affecting other parts
- Increased security of data
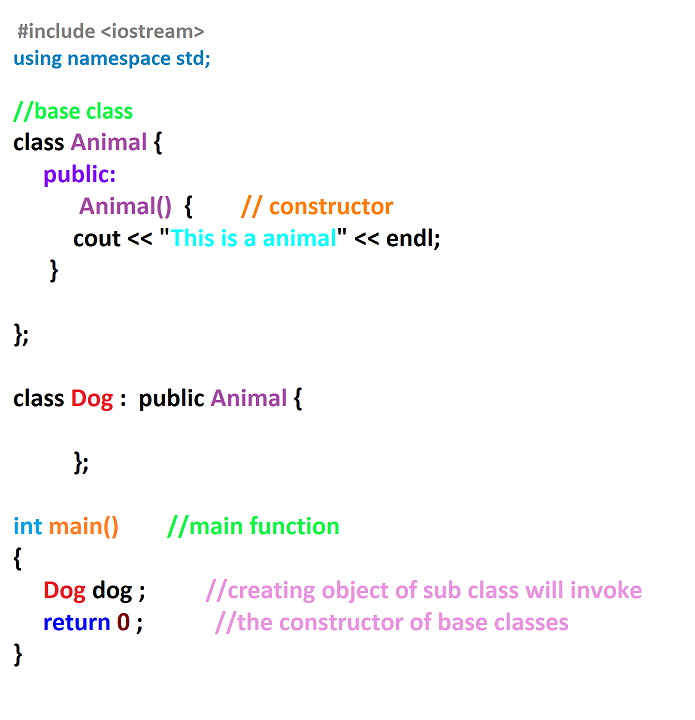
C++ Inheritance
Inheritance
In C++, it is possible to inherit attributes and methods from one class to another. We group the "inheritance concept" into two categories:
- derived class (child) - the class that inherits from another class
- base class (parent) - the class being inherited from
To inherit from a class, use the : symbol.
In the example below, the Car class (child) inherits the attributes and methods from the Vehicle class (parent):
Example
// Base class
class Vehicle {
public:
string brand = "Ford";
void honk() {
cout << "Tuut, tuut! n" ;
}
};
// Derived class
class Car: public Vehicle {
public:
string model = "Mustang";
};
int main() {
Car myCar;
myCar.honk();
cout << myCar.brand + " " + myCar.model;
return 0;
}
Why And When To Use "Inheritance"?
- It is useful for code reusability: reuse attributes and methods of an existing class when you create a new class.
.png)
C++ Inheritance
Inheritance
In C++, it is possible to inherit attributes and methods from one class to another. We group the "inheritance concept" into two categories:
- derived class (child) - the class that inherits from another class
- base class (parent) - the class being inherited from
To inherit from a class, use the : symbol.
In the example below, the Car class (child) inherits the attributes and methods from the Vehicle class (parent):
Example
// Base class
class Vehicle {
public:
string brand = "Ford";
void honk() {
cout << "Tuut, tuut! n" ;
}
};
// Derived class
class Car: public Vehicle {
public:
string model = "Mustang";
};
int main() {
Car myCar;
myCar.honk();
cout << myCar.brand + " " + myCar.model;
return 0;
}
Why And When To Use "Inheritance"?
- It is useful for code reusability: reuse attributes and methods of an existing class when you create a new class.
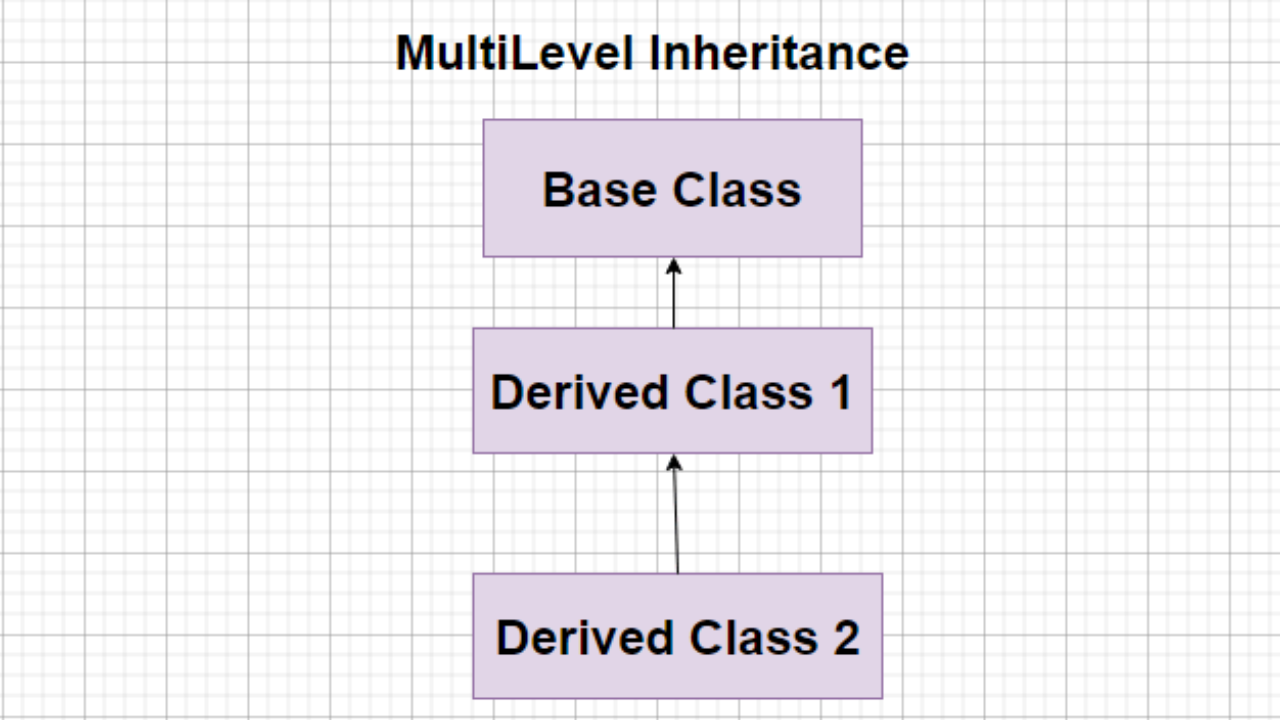
C++ Multilevel Inheritance
Multilevel Inheritance
A class can also be derived from one class, which is already derived from another class.
In the following example, MyGrandChild is derived from class MyChild (which is derived from MyClass).
Example
// Base class (parent)
class MyClass {
public:
void myFunction() {
cout << "Some content in parent class." ;
}
};
// Derived class (child)
class MyChild: public MyClass {
};
// Derived class (grandchild)
class MyGrandChild: public MyChild {
};
int main() {
MyGrandChild myObj;
myObj.myFunction();
return 0;
}
C++ Multiple Inheritance
Multiple Inheritance
A class can also be derived from more than one base class, using a comma-separated list:
Example
// Base class
class MyClass {
public:
void myFunction() {
cout << "Some content in parent class." ;
}
};
// Another base class
class MyOtherClass {
public:
void myOtherFunction() {
cout << "Some content in another class." ;
}
};
// Derived class
class MyChildClass: public MyClass, public MyOtherClass {
};
int main() {
MyChildClass myObj;
myObj.myFunction();
myObj.myOtherFunction();
return 0;
}
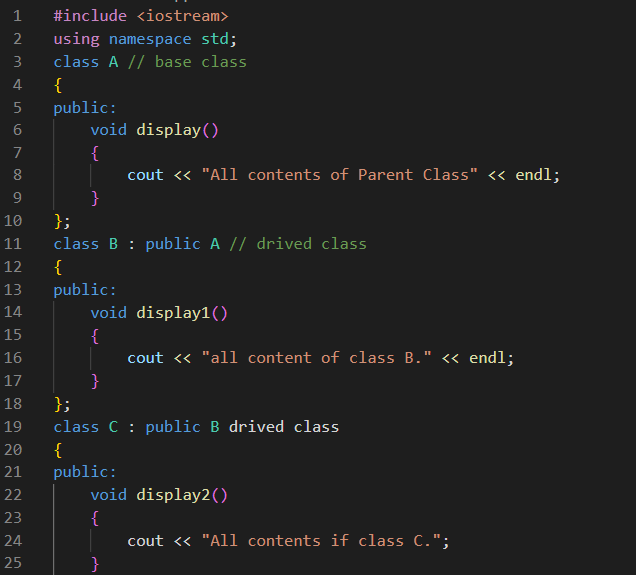
C++ Inheritance Access
Access Specifiers
You learned from the chapter that there are three specifiers available in C++. Until now, we have only used public (members of a class are accessible from outside the class) and private (members can only be accessed within the class). The third specifier, protected, is similar to private, but it can also be accessed in the inherited class:
Example
// Base class
class Employee {
protected: // Protected access specifier
int salary;
};
// Derived class
class Programmer: public Employee {
public:
int bonus;
void setSalary(int s) {
salary = s;
}
int getSalary() {
return salary;
}
};
int main() {
Programmer myObj;
myObj.setSalary(50000);
myObj.bonus = 15000;
cout << "Salary: " << myObj.getSalary() << "n";
cout << "Bonus: " << myObj.bonus << "n";
return 0;
}
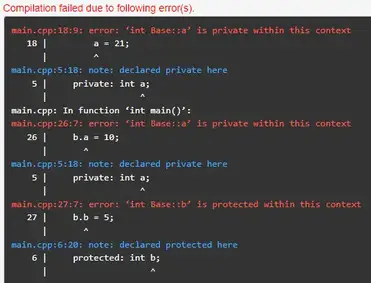
C++ Polymorphism
Polymorphism
Polymorphism means "many forms", and it occurs when we have many classes that are related to each other by inheritance.
Like we specified in the previous chapter; lets us inherit attributes and methods from another class. Polymorphism uses those methods to perform different tasks. This allows us to perform a single action in different ways.
For example, think of a base class called Animal that has a method called animalSound(). Derived classes of Animals could be Pigs, Cats, Dogs, Birds - And they also have their own implementation of an animal sound (the pig oinks, and the cat meows, etc.):
Example
// Base class
class Animal {
public:
void animalSound() {
cout << "The animal makes a sound n";
}
};
// Derived class
class Pig : public Animal {
public:
void animalSound() {
cout << "The pig says: wee wee n";
}
};
// Derived class
class Dog : public Animal {
public:
void animalSound() {
cout << "The dog says: bow wow n";
}
};
Remember from the that we use the : symbol to inherit from a class.
Now we can create Pig and
Dog objects and override the animalSound() method:
Example
// Base class
class Animal {
public:
void animalSound() {
cout << "The animal makes a sound n";
}
};
// Derived class
class Pig : public Animal {
public:
void animalSound() {
cout << "The pig says: wee wee n";
}
};
// Derived class
class Dog : public Animal {
public:
void animalSound() {
cout << "The dog says: bow wow n";
}
};
int main() {
Animal myAnimal;
Pig myPig;
Dog myDog;
myAnimal.animalSound();
myPig.animalSound();
myDog.animalSound();
return 0;
}
Why And When To Use "Inheritance" and "Polymorphism"?
- It is useful for code reusability: reuse attributes and methods of an existing class when you create a new class.
C++ Files
C++ Files
The fstream library allows us to work with files.
To use the fstream library, include both the standard AND the header file:
Example
#include
#include
There are three classes included in the fstream library, which are used to create, write or read files:
| Class |
Description |
ofstream |
Creates and writes to files |
ifstream |
Reads from files |
fstream |
A combination of ofstream and ifstream: creates, reads, and writes to files |
Create and Write To a File
To create a file, use either the ofstream or fstream class, and specify the name of the file.
To write to the file, use the insertion operator (<<).
Example
#include
#include
using namespace std;
int main() {
// Create and open a text file
ofstream MyFile("filename.txt");
// Write to the file
MyFile << "Files can be tricky, but it is fun enough!";
// Close the file
MyFile.close();
}
Why do we close the file?
It is considered good practice, and it can clean up unnecessary memory space.
Read a File
To read from a file, use either the ifstream or fstream class, and the name of the file.
Note that we also use a while loop together with the getline() function (which belongs to the ifstream class) to read the file line by line, and to print the content of the file:
Example
// Create a text string, which is used to output the text file
string myText;
// Read from the text file
ifstream MyReadFile("filename.txt");
// Use a while loop together with the getline() function to read the file line by line
while (getline (MyReadFile, myText)) {
// Output the text from the file
cout << myText;
}
// Close the file
MyReadFile.close();
C++ Exceptions
C++ Exceptions
When executing C++ code, different errors can occur: coding errors made by the programmer, errors due to wrong input, or other unforeseeable things.
When an error occurs, C++ will normally stop and generate an error message. The technical term for this is: C++ will throw an exception (throw an error).
C++ try and catch
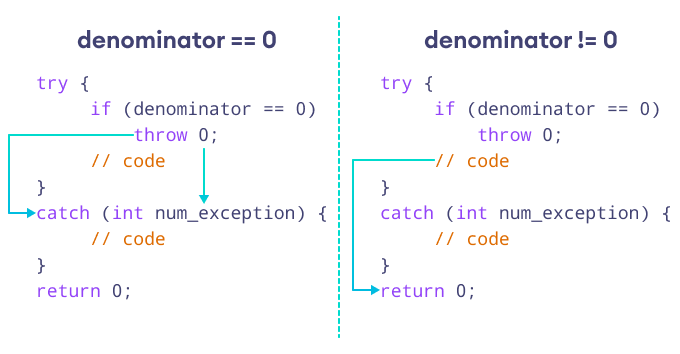
Exception handling in C++ consist of three keywords: try, throw and catch:
The try statement allows you to define a block of code to be tested for errors while it is being executed.
The throw keyword throws an exception when a problem is detected, which lets us create a custom error.
The catch statement allows you to define a block of code to be executed, if an error occurs in the try block.
The try and catch keywords come in pairs:
Example
try {
// Block of code to try
throw exception; // Throw an exception when a problem arise
}
catch () {
// Block of code to handle errors
}
Consider the following example:
Example
try {
int age = 15;
if (age >= 18) {
cout << "Access granted - you are old enough.";
} else {
throw (age);
}
}
catch (int myNum) {
cout << "Access denied - You must be at least 18 years old.n";
cout << "Age is: " << myNum;
}
Example explained
We use the try block to test some code: If the age variable is less than 18, we will throw an exception, and handle it in our catch block.
In the catch block, we catch the error and do something about it. The catch statement takes a parameter: in our example we use an int variable (myNum) (because we are throwing an exception of int type in the try block (age)), to output the value of age.
If no error occurs (e.g. if age is 20 instead of 15, meaning it will be be greater than 18), the catch block is skipped:
You can also use the throw keyword to output a reference number, like a custom error number/code for organizing purposes:
Example
try {
int age = 15;
if (age >= 18) {
cout << "Access granted - you are old enough.";
} else {
throw 505;
}
}
catch (int myNum) {
cout << "Access denied - You must be at least 18 years old.n";
cout << "Error number: " << myNum;
}
Handle Any Type of Exceptions (...)
If you do not know the throw type used in the try block, you can use the "three dots" syntax (...) inside the catch block, which will handle any type of exception:
Example
try {
int age = 15;
if (age >= 18) {
cout << "Access granted - you are old enough.";
} else {
throw 505;
}
}
catch (...) {
cout << "Access denied - You must be at least 18 years old.n";
}
C++ How To Add Two Numbers
Add Two Numbers
Learn how to add two numbers in C++:
Example
int x = 5;
int y = 6;
int sum = x + y;
cout << sum;
Add Two Numbers with User Input
In this example, the user must input two numbers. Then we print the sum by calculating (adding) the two numbers:
Example
int x, y;
int sum;
cout << "Type a number: ";
cin >> x;
cout << "Type another number: ";
cin >> y;
sum = x + y;
cout << "Sum is: " << sum;

C++ Examples
C++ Syntax
C++ Output/Print
C++ Comments
C++ Variables
C++ User Input
C++ Data Types
C++ Operators
C++ Strings
C++ Math
C++ Booleans
C++ If...Else (Conditions)
C++ Switch
C++ Loops
C++ Arrays
C++ References
C++ Pointers
C++ Files
C++ Functions
C++ Classes/Objects
C++ Online Compiler
C++ Compiler (Editor)
With our online C++ compiler, you can edit C++ code, and view the result in your browser.
Example
#include
using namespace std;
int main() {
cout << "Hello World!";
return 0;
}
Hello World!
Click on the "Try it Yourself" button to see how it works.
C++ Compiler Explained
The window to the left is editable - edit the code and click on the "Run" button to view the result in the right window.
The icons are explained in the table below:
| Icon |
Description |
| |
Go to www.w3schools.com |
| |
Menu button for more options |
| |
Change orientation (horizontally or vertically) |
| |
Change color theme (dark or light) |
If you don't know C++, we suggest that you read our from scratch.
C++ Exercises
You can test your C++ skills with W3Schools' Exercises.
Exercises
We have gathered a variety of C++ exercises (with answers) for each C++ Chapter.
Try to solve an exercise by editing some code, or show the answer to see what you've done wrong.
Count Your Score
You will get 1 point for each correct answer. Your score and total score will always be displayed.
Start C++ Exercises
Good luck!
If you don't know C++, we suggest that you read our from scratch.
C++ Quiz
You can test your C++ skills with W3Schools' Quiz.
The Test
The test contains 25 questions and there is no time limit.
The test is not official, it's just a nice way to see how much you know, or don't know, about C++.
Count Your Score
You will get 1 point for each correct answer. At the end of the Quiz, your total score will be displayed. Maximum score is 25 points.
Start the Quiz
Good luck!
If you don't know C++, we suggest that you read our from scratch.
Kickstart your career
Get certified by completing the course
w3schools CERTIFIED . 2023
C++ Certification
Document your skills
Improve your career
Study at your own pace
Save time and money
Known brand
Trusted by top companies
Who Should Consider Getting Certified?
Any student or professional within the digital industry.
Certifications are valuable assets to gain trust and demonstrate knowledge to your clients, current or future employers on a ever increasing competitive market.
W3Schools is Trusted by Top Companies
W3Schools has over two decades of experience with teaching coding online.
Our certificates are recognized and valued by companies looking to employ skilled developers.
Save Time and Money
Show the world your coding skills by getting a certification.
The prices is a small fraction compared to the price of traditional education.
Document and validate your competence by getting certified!
Exam overview
Fee: 45 USD
Number of questions: 50
Requirement to pass: 75% correct answers
Time limit: 50 minutes
Number of attempts to pass: Two
Exam deadline: None
Certification Expiration: None
Format: Online, multiple choice
Advance Faster in Your Career
Getting a certificate proves your commitment to upgrading your skills.
The certificate can be added as credentials to your CV, Resume, LinkedIn profile, and so on.
It gives you the credibility needed for more responsibilities, larger projects, and a higher salary.
Knowledge is power, especially in the current job market.
Documentation of your skills enables you to advance your career or helps you to start a new one.
How Does It Work?
- Study for free at W3Schools.com
- Study at your own speed
- Test your skills with W3Schools online quizzes
- Apply for your certificate by paying an exam fee
- Take your exam online, at any time, and from any location
Get Your Certificate and Share It With The World
Example certificate:
Each certificate gets a unique link that can be shared with others.
Validate your certification with the link or QR code.
Check how it looks like in this .
Share your certificate on LinkedIn in the Certifications section in just one click!
Document Your Skills
Getting a certificate proves your commitment to upgrade your skills, gives you the credibility needed for more responsibilities, larger projects, and a higher salary.
Looking to add multiple users?
Are you an educator, manager or business owner looking for courses or certifications?
We are working with schools, companies and organizations from all over the world.
Login

.png)
.png)
.png)

.png)

.jpg)
.jpg)
.png)
.jpg)
.jpg)
.png)
.jpg)
.png)
.jpg)
.jpg)
.jpg)
.jpg)
.png)
.jpg)